Monday, December 14, 2015

XV-88S Broadside Variant


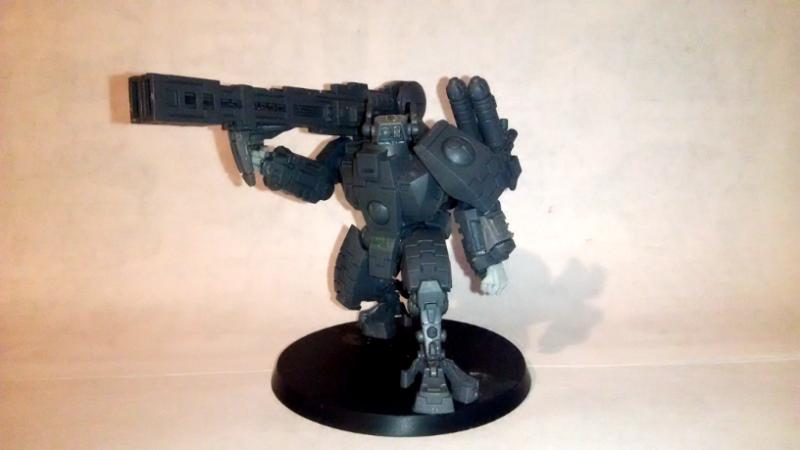
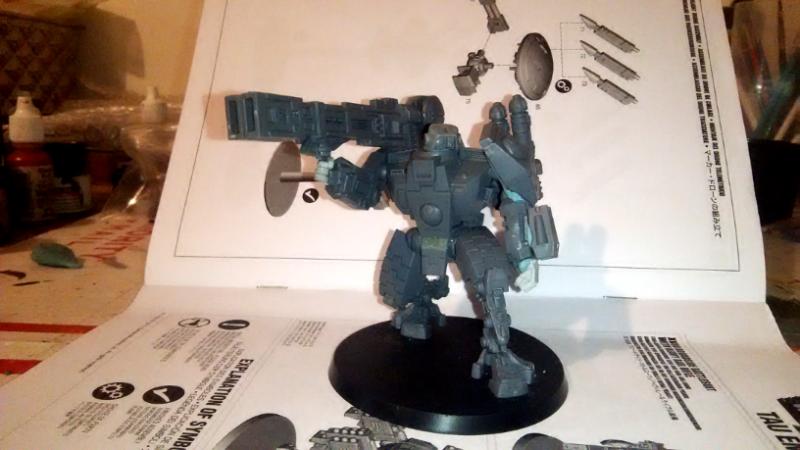
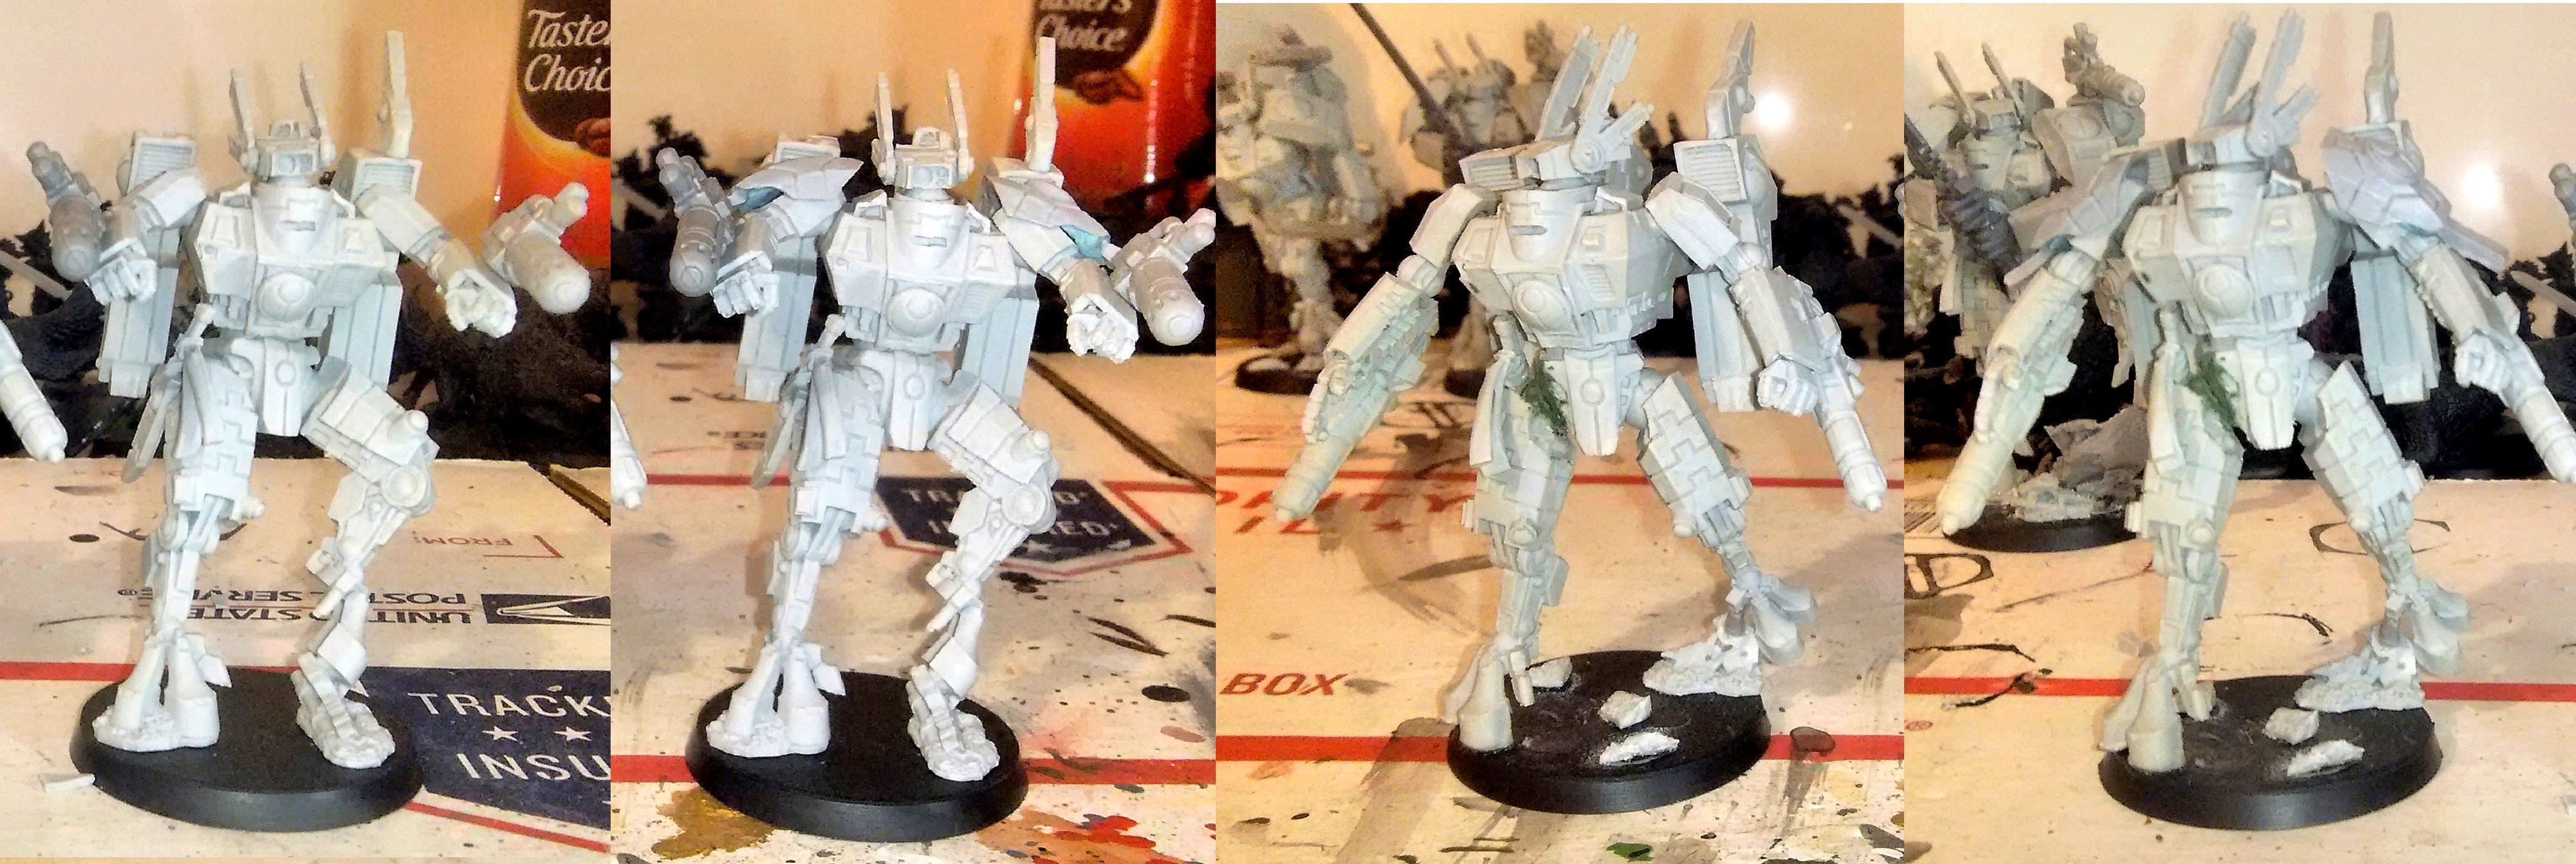
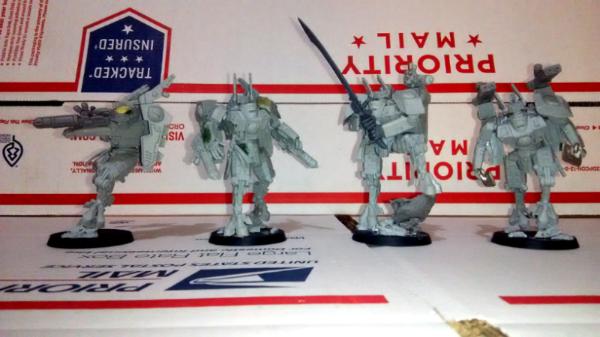
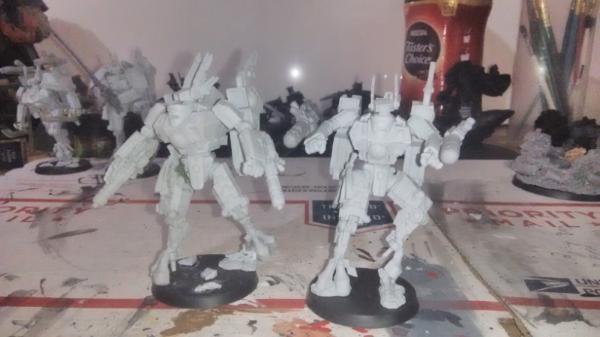
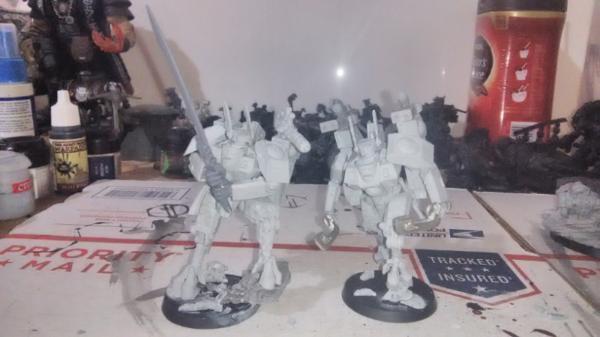
 So here is the final basic build after making some additional changes and additions to my prototype.


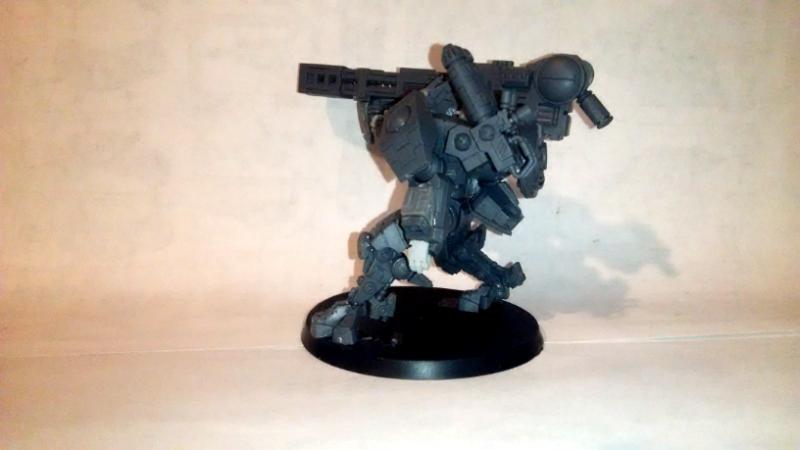
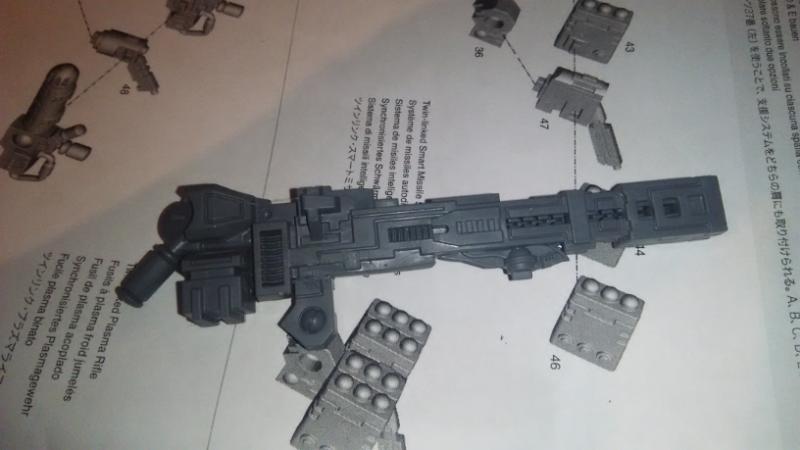
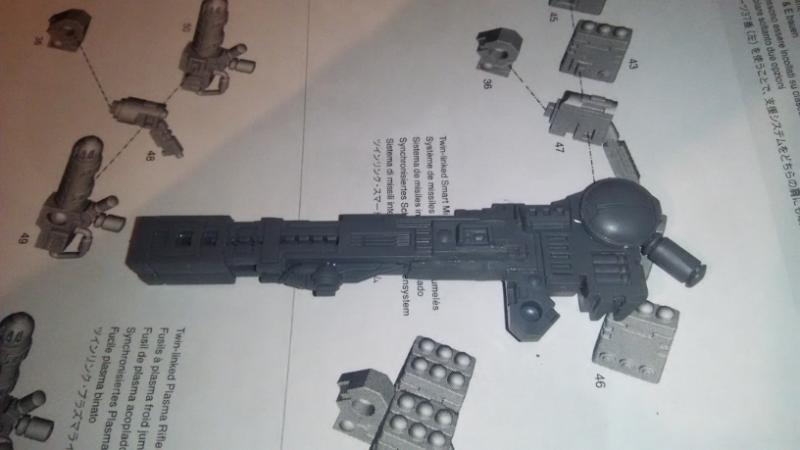
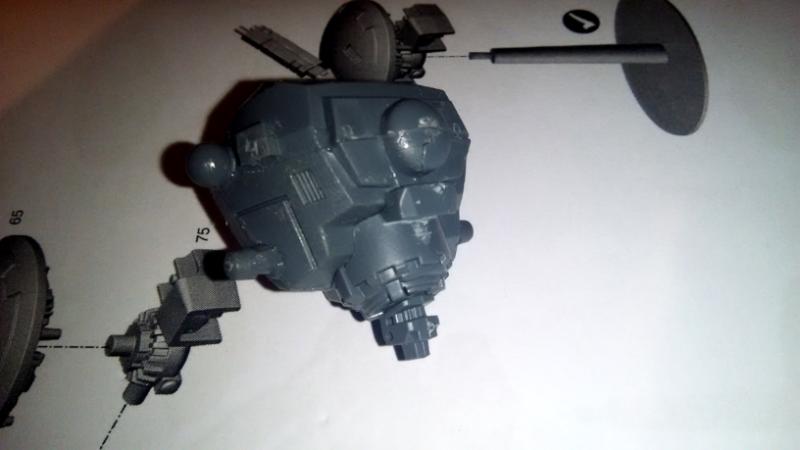
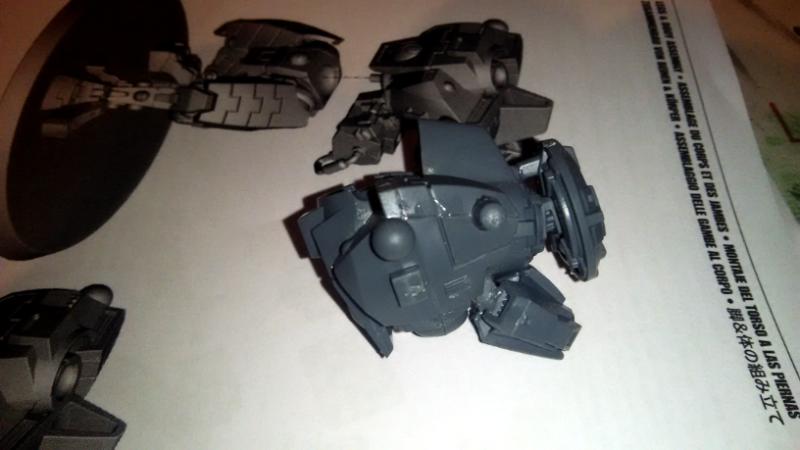
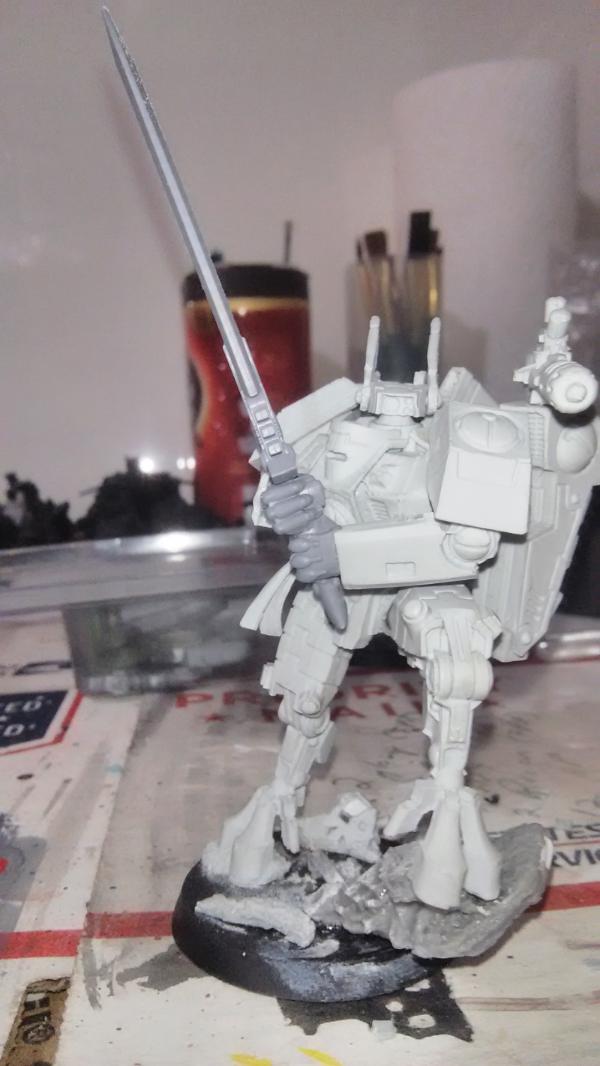
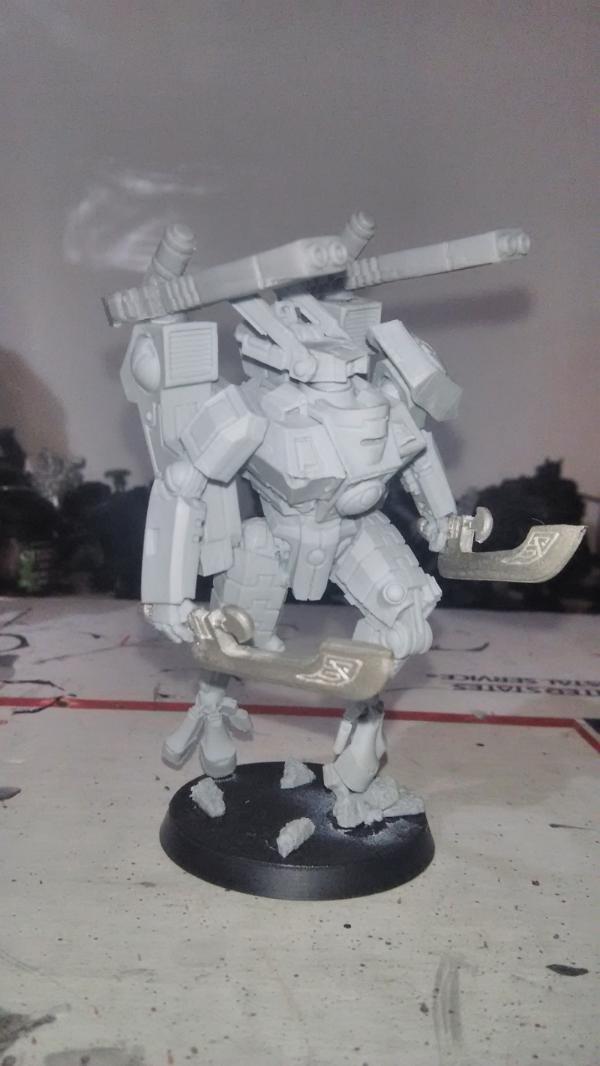
Changes from my initial prototype include the new support system conversion on the left arm, the sensor head dog ears (the riptide head I'm using had a single unicorn antenna that I was initially going to use), a railgun grip guard in front of the hand, and dual fins on the calves to further accentuate the increased maneuverability of this broadside variant.  My initial goals for this model were to model both the bazooka railgun (thanks again to Kael'yn for the initial proof of concept with the new kit!) as well as the booster nozzle that gives the model deep strike and relentless.  There are still a few tweaks I'm planning on like adding a commander's honor blade (it is technically for a Farsight Retaliation Cadre after all) to both the broadside and the Riptide (which must now take them whereas they were previously not an option) but I'll have to see if I can get a fair price on the bits.  Likely in the intervening period, I'll probably think of a few more tweaks in the meantime.  Below is the fluff that I was developing for my variant model.


XV-88S "Si'ts-Kree" High Maneuverability Broadside Variant

With the rapid pace of weapons development in the Third Sphere Expansion, the Fire Caste noticed an acute need for added firepower to accompany the more aggressive, long ranged, and fast paced use of Crisis Suits exemplified by the new Retaliation Cadre doctrine.  In traditional Fire Caste doctrine, the broadside filled this role quite honorably but it lacked the manueverability necessary to support faster moving cadres once they deployed from their Orca transports.  Additionally, the broadsides were almost completely immobile and unable to participate in extreme environments like underwater or in a vacuum.  Recent advances like the Riptide and it's variants have addressed this need for greater mobile suit firepower somewhat but the availablility of this until recently secret and experimental suit is limited and mass production on the scale of crisis suits is cost prohibitive.  It was decided by the Earth Caste under the direction of the Ethereals and the request of the Fire Caste to develop a high mobility version of the venerable broadside suit.

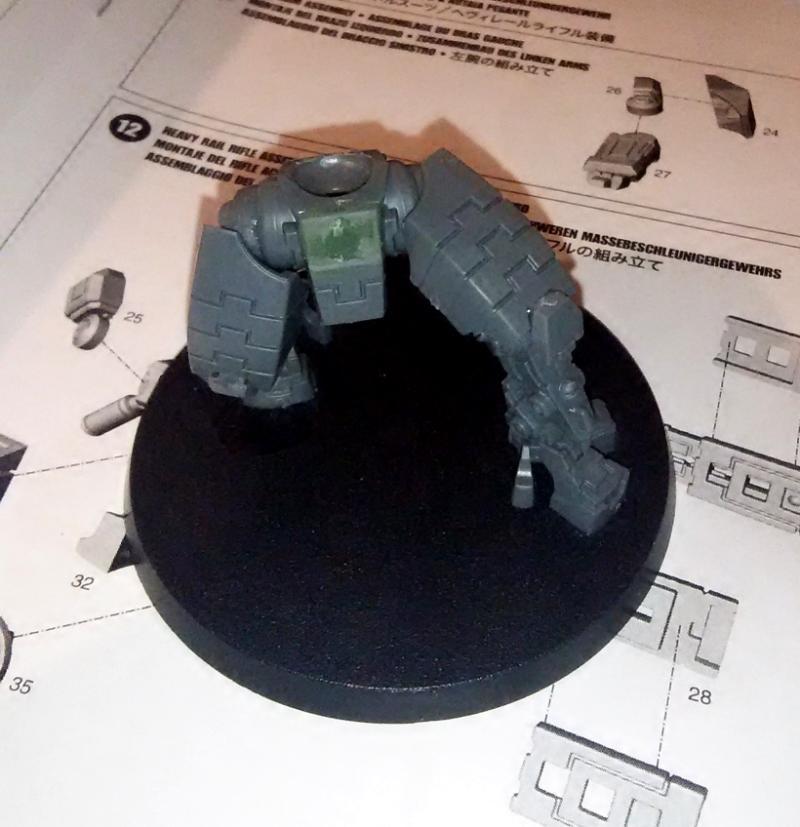
The highly efficient coolant system under the powerplant was removed and was miniaturized significantly despite maintaining 70% capacity.  It was then placed within the suit torso and coupled with a moderate improvement in the powerplant.  In its place, a single large thruster nozzle was placed capable of short intense burns along with some additional flight stability fins on the legs.  With the thruster is not powerful enough to actually propel the Broadside in sustained atmospheric flight, it is capable of arresting the suit's fall when air dropped from a moving Orca as well as propelling the suit both underwater and in space at moderate speed.  During normal operations, the improved powerplant and targeting software allow added mobility while simultaneously fully charging the railgun and plasma weaponry, previously not consistently possible without a devastating loss of accuracy.  The smaller cooling system is less efficient admittedly and the suit does suffer in the traditional role of sustained full battlefield Hunter cadre support fire.  It is however sufficient for the short but decisive engagements that Retaliation Cadres typically engage in.

It was decided to name the variant after an ungainly Kroot end evolution common to their homeworld.  The Si'ts-Kree is an ungainly large flightless bird with an abnormally large beak and powerful bite.  While technically flightless, it is capable of powerful jumps that allow it to reach perches high up in the tree canopies that would otherwise be impossible to reach for a creature of that size and bulk.  It then typically drops down on the unsuspecting prey and kills it with its powerful beak.

Sunday, December 13, 2015

Bazooka Mecha Joe Tau Conversion


Unfortunately, I had to take an unexpected break from my Tau project due to delays in getting my broadside but finally got it a few weeks ago and worked on it this weekend after recently finishing two HALO Fleet Battles fleets.  I roughly followed my idea above with some tweaks of my own to customize it.  Sorry about the pics below as I was taking them while working, snapping pics as I worked on the next step (as evidenced by the instructions and still wet glue!).  While I did plan out and virtually measure twice, I had to improvise a bunch of changes on the fly.

Starting with the railgun, I test fitted it on the other shoulder but decided to keep it on the same side. It just looked better and was more reminiscent of an old RPG fav, the Rifts Glitterboy.  I decided to keep its original orientation instead of flipping it like my inspiration above.  I cut away the same large piece above (click his link to see his step by step photo) but decided not to use it as a grip.  It would be too bulky since I planned on using spare leftover Enforcer hands on the model.  I put on all but one of the original railgun bits (the sensor head scope) and filled in the remaining gaps on the other side where the other hand/arm would go with a spare Broadside "face" bit for the head (you get 5 or 6 with the kit).  I'll probably put a small antenna on the back disc area on the outside face of the gun.  I mounted the back of the railgun on the peg that attaches to the powerplant as well. Finally, for the grip, I decided o use the mounting rail for the seeker missile I wouldn't be using.


I knew I wasn't going to use the missile because I planned to use the bits for a conversion.  I'm building a retaliation cadre in which the broadsides are both relentless and can deep strike, neither of which they normally do.  So I made up some fluff that I'll post later about a new Broadside variant that trades sustained fire capability for additional maneuverability.  To show this on the model, I decided to skip the cooling fan under the powerplant and mount the seeker missile bit there instead.  You need to remove the tab above the back waist on the broadside and slightly trim the intake side of the missile booster engine but it fits as shown below fairly well with minimal fuss with the edge with the longer railing on the bottom. 


This conversion pushes the torso a tiny but forward and I had to trim off and gap fill the raised bump on the broadside groin guard as well as it bumped against the center bottom chest armor when dry fitting.


Since I'm going with an anti-heavy infantry theme for this cadre, I chose the plasma guns as my secondary weapon option. I tried mounting it different ways on the arm but thought they all looked too busy.  Instead, I decided to also mount it on the back.  When I used the normal spacer piece the instructions said, the barrels looked too separated for my tastes and jutted out too far when in the "launch" vertical position I planned on using.  I just trimmed them a bit on the inside face and mounted them directly onto the peg.  It's style over function though as if they were to rotate forward to fire then they'd be blocked bybtge shoulder pad without the spacer piece.  I suspect in fluff the earth caste has miniaturized an extension within the mounting to counteract this.  :)  Here is my initial blu tac mockup with most of the pieces.


I still wanted to show a support system on the model but I didn't like any of the existing ones on the left arm mounting so I tried tried using the remaining scope bit from the railgun.  I decided that too was too bulky and latter kitbashed a custom piece.  I used my leftover Yvahra Riptide head as it was squat and bulky enough that I thought it worked well with the broadside aesthetics.  For the arms, I used two sets of left forearms and right shoulders to lengthen the limbs.  The right railgun arm of the broadside was just too short and asymmetrical for my tastes and I had an extra from months ago when I ordered bits in my unsuccessful quest for alternate Riptide shoulder pads (detailed above).  It was a win-win situation!

I'll be working on gluing this together later tonight and I've already got a few tweaks in mind as well.

Thursday, December 10, 2015

The Alien Armada has arrived

Well, I finished up my Zentraedi themed Covenant fleet.  I tried to incorporate all the main colors (green, black, yellow, and grey) but had trouble putting the grey in.   There is usually a trim of black across the middle of Zentraedi ships that "blooms" into a grey area but I couldn't really find a good place to do it.  I tried putting a grey areas on the top, on the back "wings", and just on various struts underneath.  The biggest model, the ORS cruiser, has a spot for it on the top front but I wanted a consistent design throughout and didn't really find one so I decided to just accentuate a few minor fins in grey.

 
Normally I overcoat a few times with gloss spray and then do a final dull coat to take off the shine (too many layers of dull leads to frosting!)... but, as a nod to the usually metallic reflective Covenant color schemes, I decided to leave it shiny.  I think it's a nice juxtapostion to my dull coated utilitarian brick UNSC ships.

I've got more ships to build for both factions but I'll probably take a break from them for a bit because I don't actually have any space left to put more models in my carrying case for this game.  The above fleets give me roughly 800pts worth of ships for each side which is enough hopefully to get a taste of the game in practice and for unofficial demos.

Next up, I've got one more Tau Broadside battlesuit left to build for my small retaliation cadre to finish off the hobby work for the year.  While I didn't plan it that way, one more green model is on the way in 2015!

Tuesday, December 1, 2015

Have the Zentraedi joined the Covenant?

Just a quick update... I've decided to continue painting some of my Halo Fleet Battles ships to give myself a fleet to fight against with my UNSPACY fleet.  I had already dipped my toe in the Macross pool with my decals on the human fleet and my previous Covenant paint scheme (the "Tron Legacy" look) didn't work out as well as I had hope so I just went full in on the Macross crossover theme.  I'll be painting up my Covenant ships in the typical Zentraedi paint scheme from the anime shown below:


Sorry for the bad cell phone pic in a dimly lit basement but I just finished the work for today.  So far, I've done the base coat, a wash, and a drybrush of the base color again to highlight the raised parts.  I just have to pick out which parts I'll be detailing in black, grey, and yellow next.


I took out my x-wing miniatures from my carrying case so I have a little bit more room to play with.  Initially, I planned on just dividing up my human fleet down the middle for demos but the extra room gives me enough space to instead put in a roughly equal Covenant fleet along with an RDF/UEDF force for the Robotech minis game as well (my zentraedi were to be split down the middle for demos as well previously).  Now I'll have the rules, dice, counters, and minis for two separate Heavy Gear, Robotech, and Halo factions if I find someone interested in playing them.  On another side note, I finally got my Tau model over the weekend as well so I hope to finish off the year with that quick project to complete my mini-tau Farsight force.

Friday, November 20, 2015

Slipspace rupture detected!


I had planned on working on some Tau but there was/is a small complication with that plan so I worked on Halo instead.  Regarding the Tau, I picked a model on ebay and didn't notice that the seller had given himself a very generous two week handling time (in addition to shipping).  I haven't seen something like that on ebay for an "in stock" since the days before paypal when you'd send postal money orders in the mail and cross your fingers but it's my fault for not noticing that buried in the description.  

In the meantime, it's been a blessing in disguise as I've been able to work on my Halo Fleet Battles starter UNSC fleet instead.  There is nothing too fancy here but here is about a starter set's worth of ships (one big ship added, 15 of the tiny frigates not done).   The paint scheme is a simple two tone grey followed by a wash, drybrush, detailing, and edging. I unfortunately dont have an airbrush so no fancy engine or weapon lighting effects in this fleet. The scheme needed a little something more to accentuate the colors so I dug through my pile of decals and came up with the closest things to the UNSC eagle and title I could find.  I planned on working on another nine frigates this weekend but ironically my carrying case is completely full with this fleet so I'll probably hold off until I can find a regular opponent.


This fleet comes out to 1000-1250pts depending on how I configure the models in squadrons and how many fleet options that don't require physical models (like Spartans) I use.  I haven't played a game yet but from watching various youtube battle reports it should be on the low end of average for game size.

Saturday, November 7, 2015

The (Tau) Empire Strikes Back!


While I've still been slowly working on my Halo models, I've always had my future Tau models on my hobby desk staring back at me.  It's been a few months since my last tau update but I decided to put the project on hold for a bit as the Tau codex rumors started to gain steam this summer.  The new codex came out and I've been trying to see how both my main Tau army and the small Farsight force I've chronicled here fit into the "new" book.  My main army is large enough to give me a few options but the Farsight force needs more tweaking.

I initially planned to next add two Forgeworld remora drones next to the force but since FW has yet to update their rules but admittedly only been a few weeks.  While the option to use a small Farsight ally force of my existing models still works for now, there are two problems.  The first is that there are now rumors of a Farsight campaign book in a few weeks and also a redone enclaves subcodex in a few months.  With GW now officially embracing the "decurion" onion layeres formation style of army building, the rules that make my small force legal are likely to go away.  The second is that the new style of army building gives just too many freebie rules to ignore especially as any likely opponent will be using something similar for free as well.

The easiest way currently of achieving the same effect (a small semi independent crisis suit force) is to turn them into a retribution force from the hunter contingent.  In order to use that though, I need to acquire a broadside model.  I have a forgeworld xv-88-2 but it just doesn't have the bulk necessary to accompany my enforcer suits so it'll have to be the current plastic.  The best loadout currently is the missiletide suit but I neither like the look of that version nor does it fit into my theme of a small anti-elite armor force.  Instead, I'll be using the currently unfashionable post-nerf railgun plasma rifle version.  I'm also not a fan of that look but it has good conversion potential.

Because of the way the current plastic kit is laid out, the middle model is out as an inspiration.  A popular and useful conversion now is to do something similar to the right and magnetize the railgun tip so that you can swap on the missiles for the other loadout.


I like the options this affords and for a while (long before this codex came out) this was my top choice...until I found this!


As you can see, it's similar in style to my previous squad entry on the left.  I plan to make a few changes to both weapons and other parts (like adding hands!) but the overall bazooka look is what I'll go for.  I've got some ideas about switching the railgun bazooka over to the other shoulder and having the second hand come over to stabilize it but I'll have to wait until I get a model to see if the idea is truly viable.  Luckily, I have some extra broadside railgun bits including arms that I picked up for my riptide (namely the shoulder pad) that may expand the options.

Saturday, October 17, 2015

Halo Fleet Battles Assembly Review

I got a bit more done with my Halo UNSC fleet so I figured it was a good point to stop for a bit and post a quick review.  Just in case it comes up, I was not reimbursed for this review but got the kits on my own.  If anyone from Spartan Games reads this, I wounded certainly not be opposed to recieving and reviewing further kits.  :)

I started with the UNSC human fleet first.  Overall, I'm very impressed with the kits and sprues.  The sprues were very well laid out and labelled with very little confusion in assembling the models.  The one time I had a question that wasn't clear just from looking at the parts and finished model, the answer had its own little box clearly the orientation needed for the parts.  Small details like recessed Battlestar Galactica style fighter launch and landing bays were hidden under the forward wings of the carrier model.


So far, my starter fleet will consist of two large carriers, four medium cruisers, and four stands of three frigates each.  For potential demos, I can divide the force in two.  Small fighter combat is a big interest of mine in space games so I'll be using left over Babylon 5 Fleet Action scale Earth fighters mounted multiple on each 20mm base instead of just counters.  I've also decided to lighten up my proposed two grey paint scheme from the previously posted pic by one shade.  Later tonight I'll be testing out my various washes to see which ones will make the panel lines pop out the most.

Tuesday, October 6, 2015

Autumn Update

Sorry about the big break in posting but frankly I haven't had much hobby progress to report.  I'm largely done with my Tau Farsight ally force except for two Remora drones and the rumors of an upcoming codex this past summer put a hold on future purchases until I could see the new rules.  The rumors are now fact as two of the new upcoming models have started to get official previews so I'll revisit my Tau again in a few weeks to see how/if I can use the Remoras as something official from the codex.

In the meantime, those sneaky Brits came out with another nice game that caught my eye and scratched an itch I didn't know I still had for over a decade.  Halo Fleet Battles came out and the minis were nice and I've been a longtime fan of the universe (games and books).  The price point for a starter is a bit high but I got a good trade done for the game with my existing pile o' shame.  I did some quick initial test pieces to see how my ideas for a paint scheme would work.  I planned to do the Covenant in a new Tron style look whereas the UNSC would be a rather typical two tone grey.  Both would use my left over Robotech decals.


The tron scheme turned out to be alot harder to pull off than I initally thought without an airbrush.  The yellow in the pic is actually alot brighter in person (crappy picture lighting) but I do think I overdid the decals on the ship.  The UNSC bigger ships would get more edge highlighting than shown above (the ships there are 1-1.5" long... tiny!).  I hope to get at least my UNSC initial fleet assembled and painted up in the weeks to come.  Hopefully, in the meantime, I'll find an opponent to actually play against!

Tuesday, July 28, 2015

Blog URL change

Just a quick technical update... After a friend changed his blog's URL (which I didn't know you could do), I decided to look and see if any of the names I initially wanted for this blog were available in the year or two since.  While the "mecha" related names were still dormant for a decade or more, the simple "sitzkrieg" blog name was now available and I decided to snap it up.  I left a quick change of address post at the original "scifisitzkrieg" blog address but all the content that I've been boring you all with will now be at this simpler addressI'll be changing the occasional dead links to the old URLs in various posts but feel free to comment if I miss one.  Thanks for reading and additionally for bearing with the changes.  And if you don't like them, comment on Brandon's Heavy Gear Thunder Run blog (link to the right) as it is his fault that I know the possibility existed!  :)


SITZKRIEG.BLOGSPOT.COM

Thanks for reading!


Thursday, July 23, 2015

Riptide ready to roll out!

Just a quick update... I finished the riptide y'vahra conversion's decals and took a group pic with the rest from the small force.  I decided to name the mech "lil' joe" and put a snarky anti-imperial comment on the shield.  It isn't It was still a bit glossy so I did another flat coat after this picture was taken.


While there were a few bumps in the road, I'm rather pleased with the final results.  I had an idea of what to do next and came up with a few ideas for the drones.  Normally, they're on separate bases but I was thinking of mounting them where the wings are (which are magnetized to prevent breakage).  The small end of the drones fit nicely in the groove.  I was trying to think of how the drones that accompany the much faster Y'vahra mech would keep up with it and I came up with "docking" idea similar to how the devilfish transport works.

I'm not sure if I'll work on my remora drones (much bigger "predator" drone style models) or the small missile drones next.  I'm leaning towards test fitting the smaller drones as a proof of concept but actually modelling and finishing the bigger remoras next. 

Tuesday, July 21, 2015

Y'Vahra in final prep for D-Day


I'd gotten a decent amount of work done in the past two weeks on my Riptide conversion.  It's not completely done yet though as the pic above was taken as the Elmer's glue was drying right after the base flock was applied.  I've still got to do the multiple overcoats of varnish (which then take a half day to fully dry in the summer heat and humidity) along with decal application in between.  I'm still figuring out exactly what decals to put where though.  I had initially planned to put a larger Allied white star on the arm shield generator but I don't have any large enough from my FOW decals and the only offered one from a fellow gamer into Bolt Action is a bit too big sadly (but thanks for the offer, Judgedoug!).  I kept largely the same scheme on the larger mecha with the faux D-Day stripes on the leg, various blues for the plasma weapons, and the white armored shoulder pad on the left.  I wasn't sure where to add the splash of red initially as I didn't want to add a giant mecha bonding knife to the model.  Even though it is largely ceremonial, it felt odd to have a weapon on the hip when neither arm would really be able to use it ever (unlike with the crisis suits).  I've been going back and forth on that one but I'll likely skip putting the old farsight sword (the one I used temporarily for a dual wielding sword commander earlier in a blog update) on his hip.

Since I'm always bugging others to put up scale shots, I put in a couple of figs from various games into the progress shot.  From the L to the R, we have a WHFB ogre (converted to a shadowrun troll RPG pc fig), a space marine, a Robotech scout pod, a Heavy Gear Cobra (made unusable by their most recent southern field guide), and my Tau Commander Farsight conversion.  I hope to have the final shots of the done model up by the end of the week.  Hopefully I'll be a bit more accurate with my completion assessment this time around.  :)

Finally, my apologies to any subscribers that got a phantom new post update last week.  Since I didn't have too much to report regarding painting progress (just the base coats for the main colors), I decided to finally add tags/labels to my blog posts.  When going through the entire list of posts, I accidentally republished an old update again but corrected the mistake soon after.

Sunday, July 5, 2015

Back to the Tau


After some work on my VOTOMS 28mm models, I'm back to the Tau.  What prompted my VOTOM work was that I could do it while listening/watching Infinity N3 battle reports on youtube.  I plan on using my Scopedogs with the Infinity rules but I finally got my hands on the silhouette templates that are used for LOS in that game and the VOTOMS are much bigger than almost every TAG (their version of mecha both manned and unmanned) in that game.  Since LOS is incredibly important, I decided to take some time to reconsider how I'd use them in that game (as well as eventually using them for a 28mm Heavy Gear Blitz/Flash game).  I also plan on doing a little bit of touch up work on my newly acquired Robotech minis as well (mainly putting them into a single coherent color scheme as well as adding some decals) but I'd like to get in a game first before doing that.

Luckily (and unluckily), the parts that I needed for my Riptide Y'Vahra conversion finally became available.  Sadly, none of the pieces I had planned for my conversion actually fit the shoulder and I'm decided on using the original riptide shoulder piece for the shoulder instead.  It's still an improvement over my earlier kitbashed attempt IMO and matches the thigh armor style so I'm ok with it.  I'm still not happy with the pose I chose (except in the full frontal view) but I'd likely snap resin instead of glue if I tried to reposition it.  My plan is to finish up the Riptide Y'Vahra this week.

And to cap this post off are the newly released pics of the upcoming Tau mecha previewed today at the Forgeworld Open Day at GW HQ.  The reception seems mixed overall but I'm definitely a fan of the gun hedgehog look of this mecha.  It reminds me of a Tau version of the Robotech MAC II Monster.


Sunday, June 28, 2015

Robotech and VOTOM Reinforcements Inbound?

Just a quick update.  Over the past week, when not tweaking the Vermilion Squadron skirmish rules, I restarted work on my 28mm VOTOM project due to a resurgence in interest on my part in the N3 Infinity rules that would allow me to use them in a game.  Previously, I had tested out some various paint schemes to no good effect.  I couldn't base coat the PVC plastic as it got sticky, painting with acyrlic directly onto the model looked odd and chipped off with storage, and just applying a wash then flat coat wasn't pretty either.  I stripped the two full votoms that I was working on and tried a new method.  The Testors flat varnish dries well on the plastic and seems to prevent the stickyness of the primer/base coat applied second.  I'll hopefully be posting some pics later this week of my guinea pig VOTOM as I need to buy some more supplies first (ran out of the flat varnish).

I also went to a not-so-local but very friendly game store flea market this weekend and picked up a nice Robotech minis force at a very good price (and best of all paid for almost completely with the store credit for what I myself sold!).  There are enough decent tabletop quality painted minis for both factions to run a 300pt game plus a few extra to spare.  Since I'm more interested in the "skirmish" side of the game, that is definitely more than enough minis for my needs!  In testing out my rules, I was basically solo'ing games using labelled bases but I'll now have some painted minis to use instead.  I'll still keep likely a squad of each type for both sides and likely sell or trade the rest.  And I didn't even have to assemble a 24 piece 1" tall destroid!  Woohoo!  :)


Thursday, June 25, 2015

Vermilion Feedback and Sample Forces

It's been a few days which is probably enough for the relatively small amount of changes in my Vermilion Squadron skirmish house rules to sink in for any readers.  I've gotten two questions and wanted to respond to the feedback.  The first was from a reader on dakka who asked why I opted to go with model within a squadron activation instead of allowing any model to be activated in any order.  My answer was threefold: backward compatibility, close formation, and ease of tracking.  I found with my Heavy Gear Blitz house rules (the FLASH! link to the right) that if you change more than just a token amount that folks who are familiar with the system simply won't try it.  It's unofficial so not worth the effort if it involves relearning what they're used to as opposed to just tweaking it a little.  By keeping the model activation "nested" within the squadron first (you must resolve all activations within a squadron before moving to the next model in the next squadron), players have some familiarity from the main game but still get the utility of activating individual models.  This is admittedly a very soft reason and I admit that keeping the squadron limitation was actually a late addition to the house rules.

edit:  In the meantime, I have tweaked the rules above in response to feedback and another trial (but only solo) game so the activation rules are no longer as described above.

The other two reasons are in reality equally soft.  It really isn't hard to remember which models have activated but it is a bit easier if you do it by squadron (I moved a valkyrie last turn so I'll have to move another this turn).  In order to utilize the close formation rule, you pretty much have to activate by squadron as the models all fire simulataneously when using the rule.  With my new reserve fire rule, you could theoretically get around that restriction but I wanted to minimize the counters on the tabletop since the main game doesn't use them.

The second bit of feedback was much broader in the form of a question about why the skirmish rules need to exist at all with the introductory scenario rules in the book.  The introductory scenarios are very rigid without any structure to expanding beyond what is written.  In the first scenario, one side gets 2x VF-1A (40pts) versus 6x Regults (35pts).  There is no room for tweaking with the rules as written and the forces aren't even technically equal.  They're perfectly adequate for learning the rules which is their primary purpose but not for playing a fuller game at a smaller points total.  You could always just say "take whatever you want for the same points total" instead of using my Vermilion rules and that would be perfectly acceptable.  I'd like to think that my house rules offer (in 40k terms) a "kill team" set of organized rules as opposed to just playing unbound at 200pts instead (which is what that alternate "take whatever" option would be akin to).

For instance, in the above scenario, a pair of players who picked up a copy of the rulebook at gencon for $10 as well as the two model packs above could either play:

2xVF-1A (40pts) + Long Range missiles (10pts) versus 6x Regults (35pts) + Veteran Warriors (10pts) + Grel (5pts)

Instead of just the two vanilla unequal forces in the intro scenario.  My goal was to come up with some skirmish scale rules that would allow folks to pretty much pick up almost any box and be able to play a customizable full feeling game with it versus another.  The only exception to this would be if someone bought only a "special" card only box like a Glaug Eldare or Mac II Monster box as specials need to be attached to a support card still due to their intended rarity in game.  Another sample force straight from the anime unplayable in the main game:

Sweet Sixteen Attack

Vermilion Squadron (2x VF-1A 40pts, 1x VF-1J 25pts, Ben 5pts, Max 10pts, Rick 10pts) 90pts
versus
Botoru Squadron  (6x Regult 35pts, 1x Glaug 20pts, 2x Light Artillery Pods 25pts, Khyron 10pts) 90pts


You could expand the above forces with the models that come in their boxes to add in a VF-1S with Roy Fokker for the UEDF and add a second squadron of another 2 artillery pods plus recon and recovery pods (along with veteran warriors) to bump up the skirmish game to the max 150pts.  

Which brings me to the final point for this post which is why I set up a limit of 150pts.  The first and foremost is that I intended these house rules to be at a specifically different model count than the normal game that starts at 300pts.  At 150pts, you could still spam two dozen units on the zentraedi side using stock regults or infantry which is already stretching the goal of a "skirmish" game to the limits.  Using the custom RPG character conversion rules, I could easily see the more expensive RPG character models going right up to the minimum 300pt main game limit without increasing the model count.  That could be useful for players who want to enact combat scenarios from their RPG campaign with a bit less lethality than the normal game would have.

As always, thanks for reading and feel free to leave feedback in the comments.

Friday, June 19, 2015

Combat Changes


  Part 3: COMBAT CHANGES

Unless specifically noted as changed below, use the rules as written in the Robotech RPG Tactics rulebook.  All house rules presented below are 100% unofficial fan creations and not endorsed by anyone except maybe me.  :)


Line of Sight (pg. 11-12):  Replace references to the "center" of the torso with "any part" of the torso (or hull for non-humanoid models).

THE TURN  

STEP 1: The Activation Step (pg. 14):  Choose a single model in your army and activate that model.  Complete the action phase steps with that model (movement, combat, resolution) before passing the activation to your opponent who activates a single model as well or passes the activation.  When determining if a player can pass a model's activation, count the individual remaining models on the table instead of squadrons to determine if which player is outnumbered.

     Stealing the Activation (pg. 14): If you have a model with the Leadership ability, roll a number of dice equal to the highest Leadership value in your force currently deployed on the table when attempting to steal or to prevent the stealing of the Activation instead of 3d6.

RANGED COMBAT

Attempt to Dodge (pg. 16): If you are hit by multiple simultaneous attacks like a missile volley or reserved attacks from a close formation (see below), you may attempt to dodge by rolling 1d6 for EACH missile or individual reserved attack instead of rolling one die for all of them.  You MAY dodge missile attacks of any volley size.  For instance, if you are hit by a volley of 6 missiles, spend a single command point to attempt to dodge and roll 6 dice using the normal rules to resolve the attack.

Close Formation (pg. 18): Because of the changes to activation above, it is now much more difficult to gain the close formation bonus.  To make up for this, you may declare after moving a model that you are reserving its ranged attack instead of firing.  Place some sort of marker next to that model.  Any models from that same squadron that subsequently ends their movement in close formation range (2") with reserved fire model or close formation must EITHER reserve their attack also OR the player must simultaneously fire with all the reserved models in that close formation including the just moved model.  If the original model with the reserved fire marker is destroyed prior to firing, simply move the marker to another model in that same close formation; if none are present, remove the marker.  Any unused reserved fire markers should be removed from the table in the next command phase.

Anti-Missile (pg. 27):  Roll 1d6 per incoming missile in a volley to see how many you shoot down instead of a single die.  For example, if you are hit by a volley of 6 missiles, you roll 6 dice to see how many individual missiles you shoot down before moving on to the next step.  

Thursday, June 18, 2015

Army Creation and Scenarios


Part 2: Army Creation and Scenarios

Unless specifically noted as changed below, use the rules as written in the Robotech RPG Tactics rulebook.  All house rules presented below are 100% unofficial fan creations and not endorsed by anyone except maybe me.  :)

INTRODUCTORY SCENARIOS (pg. 73)

Ignore this section when using the Vermilion Squadron skirmish rules.  While these scenarios may be helpful for learning the core rules, the skirmish rules presented here are intended to provide a more varied experience for smaller games.

BUILDING AN ARMY (pg. 75)

Factions: Please note that the "Life is Cheap" rule is still in effect in these skirmish house rules unlike in the official introductory scenarios.

Force Cards:  Vermilion Squadron does NOT use Core cards.  Ignore any references to them in the rules and replace "core card" with "primary support card" instead.

Support Cards: Choose one support card to create each squadron; this card is referred to as the primary support card.  Subsequent support cards may either be used as primary cards to start their own squadron OR used as a secondary support card to add to an existing squadron.  You may only add a single support card of the same type to each primary support card.  For example, you could designate a Spartan Destroid support card as a primary thereby making a squadron and then add a Phalanx Destroid Support card as a secondary to the squadron (but not a valkyrie support option as it is a different type).  Please note the additional minimum and maximum model and card count restrictions for game size listed below .  Additionally, due to the smaller format of the Vermilion Squadron rules, you shoud add the option of a support card to the UEDF faction support card list that allows the taking of a single VF-1J for 25pts.  The VF-1J has the same stats as the normal version included in a full size Veritech Squadron core card.

Special Cards:  You may choose a SINGLE special card to add to one squadron in your army.  This special card may be a RPG Character conversion if you and your opponent both agree to their use.  You may use the official special characters as normal as they do not count toward that limit unless used on a special card mecha per the normal rules.

Minimum and Maximum Requirements:  You must field a minimum of one support card per 50pts up to a maximum of two support cards per 50pts of your army (up to 150pts).  Additionally, there is a minimum of 2 models in the army to a maximum of 24 for skirmish games. 
 
STANDARD SCENARIOS (pg. 78-80)

DEMOLITION: Additional Rules: Always use the 25 MDC per card Bunker value for Vermilion Squadron skirmish games.

CONVOY DEFENSE:
      Forces: The defender gets a single squadron of 1 Convoy Vehicle per 50pts or fraction thereof.  For example, a 100pt game would have a single squadron of two convoy vehicles.
      Additional Rules: Convoy Vehicle MDC: 4

COMMON SCENARIO SPECIAL RULES (pg. 80-83)

BATTLE GROUPS: Ignore this entry as it is intended for much larger games.

SKIRMISH GAMES: The Vermilion Squadron rules presented here on this blog replace this entry.

STRATEGIC DEPLOYMENT: You may only use this rule if you have more than 4 models per 50pts of your army as well as at least two squadrons.  If you do not meet both of those criteria, you may not use this rule or any that depend on it (such as airborne assault).  Instead deploy all your models on the table as outlined on the chosen individual mission's deployment subheading.

Max, Rick, and Ben... ATTACK!


 UNOFFICIAL SKIRMISH RULES


Part 1: Introduction (below)


Part 1: Introduction

After discussing Robotech a bit more on various online forums, my interest in assembling some of the models that I received with my Kickstarter Wave 1 shipment was rekindled.  While planning out how I would build my models, my old ideas about expanding on the skirmish scale rules for Palladium's new Robotech RPG Tactics game were reignited as well.  For the TL;DR version, check out the paragraph below :)  If I'm feeling particularly verbose, I write the important part of house rule blog entries in italics prefaced by bold titles and the rest of the rather long paragraphs in the blog articles are the reasons for the rules that I came up with.  For example:

TL;DR: My goal with this house rule project is to come up with a set of variant house rules that provide a relatively complete and more granular gameplay experience at point values of 50-150pts (two to 24 models) building upon Palladium's Robotech RPG Tactics (RRPGT) rules.  I want brand new players to get a proper feel for the full game after buying any retail box of RRPGT models and for existing players (both tabletop and RPG) who have yet to complete modelling their full collections to get a more detailed game yet finish in a reasonable time (<1 hour) using what they have already built.

Initially, my interest in making the skirmish rules was two fold.  The first is that I could not via the normal rules ever play the iconic Vermilion Squadron (Rick, Max, and Ben) from the TV show and I found that to be both odd and unacceptable.  The second is that I backed the kickstarter at the "sweet spot" pledge level and would therefore have trouble fielding a full army of 300pts or more without using all of my figs, leading to little variety at the normal level of play for we with my anticipated wave 1 shipment.   Once I got the core box and read the rules, I was moderately disappointed that the previously advertised skirmish rules had apparently been left on the cutting room floor sometime over the past year and replaced with very simple introductory scenarios with premade forces instead.  While those scenarios accomplish their goal of introducing new players to the full rules and army sizes of the standard 300pt and up games, they leave alot to be desired for smaller "skirmish" level games.

With my Heavy Gear Flash! skirmish house rules (link on the right), I was attempting to "fix" the issue of Dream Pod 9 trying to force a square peg (detailed RPG derived rules) into a round hole (mass battle game) in order to get games that flowed well and were finished in a reasonable time with a reasonable model count.  With Robotoch RPG Tactics, that isn't an issue.  The rules are both streamlined and easy to learn and work well (with some notable exceptions) with the mass battle game that they're to be used for.  Instead, I'm the one trying to force the square peg (streamlined mass battle rules) into the round hole (more detailed skirmish rules)!  For instance, there are lots of all or nothing tests/rolls in the full game like dodging (you either dodge all the incoming missiles or none of them with your single roll) that I intend to "complicate" by making the results more nuanced instead of binary.  These types of changes would NOT be appropriate in full sized games as they'd slow down the action too much but I believe they will improve the feel of games at the models counts that I intend them to be used with.

I plan to post one main section of the Vermilion Squadron house rules (starting with the above Introduction) each day for the next three days.  If anyone is interested in trying them, feel free to post feedback from any games or thoughts from reading in the comment sections below posts.  In the meantime, thanks for reading!

Wednesday, June 17, 2015

Upcoming Unofficial Robotech RPG Tactics Skirmish House Rules and Tau Update

Just a quick update on my Riptide as well as a few ideas on what is to come for the blog.  I've had no luck getting the shoulder bits that I need for my Tau Riptide/Y'Vahra conversion but I have at least tested the plastic and primed the model.  I was initially afraid that the plastic wouldn't react well to the spray primer/base coat like with my Heavy Gear Votom Gashapon models but luckily that wasn't the case either with the test pieces nor the actual model.  I'm still planning on getting back to it as soon as I get the parts that I (hopefully if they fit!) need.  I'm a bit hesitant to fully start painting it though so I've moved onto other things on my waiting list.

I've had a bit of a resurgence of interest in my Robotech RPG Tactics models (or RRPGT or Tactics for short!) and have been planning out how to assemble them.  I downloaded the much improved construction guides that Palladium put out on drivethrurpg and they're a big help.  With only a single Battlecry pledge to my name, I don't have the luxury of experimenting too much with the models via conversions but I do plan on assembling a veritech squadron and some battlepods to fight it out on my cityscape terrain.  The rules as written are very streamlined and fast being meant for larger scale battles than my planned collection will be able to do justice.  After I get wave 2, I'll likely only have aobut 450pts per side with the minimum the rules recommend being 300pts for a standard game.  Without wave 2 (my current situation), I have to depend on special characters to get to the minimum game size of 300pts.

There was supposed to be a set of full skirmish rules in the game but they apparently ended up on the cutting room floor and were replaced with a page of introductory scenarios instead for new players.  My idea is to create my own skirmish rules like I did with the Heavy Gear Flash! set that I started this blog with.  Unlike with HG, the Robotech rules (with some caveats) do generally work with the scale of battle that they were developed for so my goal is to expand on them within the existing framework to work better at a model count smaller than intended.  I hope to have the update post for these houserules that details the both the goals and changes more concretely ready by the end of the week.  As stated earlier, I'm not rewriting large portions of the rules so I hopefully will be able to detail the house rules in just a couple of posts.  I encourage folks to leave comments on the future posts as I do plan on editing the house rules depending on how the reception is.

Sunday, June 7, 2015

And now for the bigger mech!

I've been working on my Riptide Y'Vahra conversion for a few evenings and this is what I've come up with so far.


I had to create the head from scratch using left over and broken star wars, transformers, and 40k Imperial/Tau/Chaos bits to give it a bit more heft compared to the original.  It's a bit too big IMO but I still prefer it to the Thrud the Barbarian tiny head the original model came with.  The arm was similarly created and I'm happy with the final effect there.  Unfortunately, I wasn't able to successfully magnetize it to allow fast switching of the normal riptide arm with the Y'Vahra variant weapon.  I figured I'd probably be playing the "normal" riptide more often and wanted the suit to look like a bigger upsized version of the smaller one so opted to glue that arm on.

One thing I'm definitely not happy about is my scratch built shoulder pad.  It just seems both too busy there as well as out of place.  I've since taken it off and repositioned it both higher up on the shoulder as well as reversed (so the short face/angle is pointing toward the elbow instead) and it does look better but I'm still not happy with the result.  I'll be trying to pick up some armor bits on ebay to test out a few other looks but for now both the shoulders are bare.

Wednesday, June 3, 2015

Farsight and Friends

I now have a legal Farsight ally force painted up!  I decided not to go too crazy with the decals (at the cost of about a half dozen or so that I applied and then took off) and just used the FOW decals as the colored ones made the model too busy.  I went with the white stars on the shoulder, chest, and back (in descending size order) as well as a few spots of text including some pilot nicknames on the forearms of each suit.  Additionally, I put a flag on the left shoulder to go with the theme.  I tried out designation numbers on the left chest for all as well as the white stars on a red bar for Farsight but they just seemed out of place.  Without further talk about stickers on my soldiers, here's the pic:


The next step for the force is to add in another (big) fig that I got in trade a little while back... a Y'Vahra!  


My plan is to convert it to be usable as both a Y'vahra as well as a normal riptide for when opponents aren't keen on using forgeworld rules (especially trial ones like the Y'Vahra currently has).  I'll have to make another left arm as I plan on using the right one for the normal riptide ion accelerator.,  I'll also probably try to convert the head into something a bit more proportional to the model.  The FW variant doesn't have as bad of a tiny head issue as the normal riptide but it still looks off IMO.  I'll hopefully start construction of the models today so might have an update on the next addition sometime late this week.

Saturday, May 30, 2015

Farsight Enclave, ready for duty?... Almost!

It took me a while to get the first layer of paint on but slow and steady work over the last two weeks has finally gotten my first hobby project of 2015 (yeah, I know...I'm really late!) close to completion.  Here is my Commander Farsight conversion along with a full squad of crisis suits to keep him company (as well as make a legal 40k Ally force).  You may notice that the squad commander with the twin shoulder/jet pack weapons lost her swords since the last post.  Unfortunately, they were too fragile and pieces broke off twice while painting.  Despite partially pinning them (only partially due to some small pommel sizes), parts were knocked off both while holding the mini for painting as well as when the model fell over after a painting table bump.  Mechanically, I can still use the same in game upgrade I planned but I will miss the visual flair the twin swords provided.  I went with the traditional US WW2 green khaki color along with some gunmetal and brass trim.  For the shoulder and leg color accents, I tried to evoke a bit of the D-Day landing stripes you see on WW2 aircraft to break up all that green. 


I just finished the bases prior to posting this so the models are currently drying.  The next step would be a quick gloss coat and then the decal work begins.  I'm frankly not sure how far to go with the decals.  I'm definitely adding the US white star decals and a US flag from the Flames of War decals below to match both the theme and my existing related Tau army but I'm waffling as to how much more to add.


I'm considering adding the red and white triple stars to the Commander Farsight model to show his "general" rank status but I'm not sure about the rest.  The same FOW decal pack has alot of nose art style names that I'd like to customize each suit with.  For instance, they have a "Blood n' Guts" decal that I could put on my commander ala Patton.  I'm not sure where to put that though (the forearms like a tatoo, the "butt" as that side is pretty sparse on detail, the top of the jet packs, etc).  The side chest is obscured too much to make it worth it frequently and the head is too small so those two options are out.  I also have another decal pack that has a ton of warning markers on it that I'm thinking about using.


Placing the radioactive marker on the powerplant between the jet pack thrusters is one idea as are putting the danger and warning symbols on the jet packs and weapons (along with the rescue possibly on the chest).  These decals are not precut so they're quite fiddly to work with and very easy to screw up which is one thing going against them.  The other thing is that I'm worried about making the model appear too busy like it belongs in NASCAR.  Any thoughts on the subject would be appreciated.  Probably tomorrow I'll start on the decals that I absolutely know I'll use and where so I should have another update on these models later in the week.  As always, thanks for reading!

Friday, April 17, 2015

Modelling like it's 1989!

I went to a swap meet a few weeks back at a local store and traded for a Tau lot that included some Forgeworld 40k Tau Broadsides.  When checking out the parts for the first time this week (beyond just making sure they were all there before), I did a quick test fit of the shoulder pads of one of the broadsides on my Tau crisis suit models.  I do rather like the results.  The bare shoulders were in a way a necessity for two reasons previously as I didn't have enough after doubling up for my Farsight model and I also needed a way to distinguish the various ranks visually.  Unfortunately I only have a single pair of shoulder pads (the second broadside was missing them) but I did some mspaint magic to show how doubled pairs would look below:


I do rather like how they look with them on.  It seems like the shoulders blend visually with the thigh armor as well as give it a bit more of a samurai anime look as well.  I've contacted Forgeworld to see if I could buy extra but assuming that won't be the case (I've never heard of them selling bits) I've gone in the meantime with one pad each on the left shoulder as with the original model.  I had to sculpt a tau symbol to place on the 2nd flat shoulder pad.  Now, the normal suits will have the smaller pad, the squad commander will have the larger pad, and the army commander will have the pair of larger pads.  I hope to take some pics tomorrow of the modifications as I'm currently waiting for my first attempt at modelling with milliput to set.

I also did some more research that confirmed my suspicions about USMC paint schemes.  It seems like the only variation was on the company level applied in the field and that the tanks left the factories in the same olive drab color as US Army vehicles.  I really don't see myself applying a camo pattern to these suits as I already have on in my normal Tau army to distinguish the "scouts" (the pathfinders and their various derivatives with markerlights).  I leaning at this point to just continuing my existing paint scheme but the original Farsight Red (with Russian decals) is still an option as is a weathered winter camo look.

Thanks for reading and that ends the update about big shoulder pads!  :)

edit:  I figured I'd just update yesterday's post instead of making another very related one.  Here is a lower down shot of the completed models.  I used Milliput to make a second tau symbol for the bare shoulder pad and I filled in the empty lip on the other shoulder pad with milliput.  I also used some liquid greed stuff to plug the casting holes in the finecast.

 The home made tau symbol had some imperfections in the edge so the green smudge you see on the edge is my attempt to rebuild it after casting it.  It looks like I won't be getting additional shoulder pads for purchase so this is the final loadout and they're pretty much ready for priming at this point.

I found last night an example of a Tau army done up in the weathered winter style pattern I mentioned using above (but without the soviet decals of course).  I'm really glad I found it because I never would have thought that it would look in practice so different from what I thought it would in theory.  The painter did a really good job completing the scheme but I in the end think that grizzled look is where I'd want to take my Tau now that I've actually seen it done by someone who likely did a better job than I'd have been capable of (especially on a first try).

I've decided to go with the US WW2 style mentioned earlier but I plan to embellish these models with more decals as well as USMC markings instead of the US army cavalry ones the main force has.  Things like cockpit markings, danger and radiation warnings, flags, etc.   I plan on making the suits a mix of tank and airplane style decals with the olive drab base color and some edge highlighting.

Saturday, April 11, 2015

Assembly completed! Now onto painting...

I finished up the assembling the rest of the crisis suits for the Farsight Ally force this past week.  I started by tweaking the weapon loadout of the last model I built.  In my older Tau force, all the crisis suits are modeled with plasma rifles and missile launchers.  The combo was an effective take all comers loadout with the previous codex's rules and visually evoked the Heavy Gear robot style as well that I'm a fan of.  With the current rules (both codex and game rules), it's much better to specialize against a particular target.  I do like the double gun(slinger) look as well so visually I'm ok with the change and if I ever do field the squad then they'll now be able to take on heavily armored infantry a bit better.  Here is the redone loadout standard crisis suit from above along with the new one that I assembled this week.  For the final model I decided to use the standard pose for the torso and legs but gave him a bit more of an active pose above the waist to contrast with the relaxed look of last week's model.


And here is the whole ally force made up of Commander Enforcer suits.  I think there is enough variability in the poses to make the squad look dynamic enough and not just carbon copies of each other.  I'd struggle to find a way to add another model from the same core model without copying one of the other poses though.  Game rules-wise, this ally force consists of Commander Farsight and a troops Crisis suit squad with one upgraded to a shas'vre with the fusion blades signature system.


The next step is thinking about how to paint them.  This will be my third successive project on the blog that, if not continued, would add to my hobby pile of (unpainted) shame so I'm definitely completing something before moving onto anything new.  Since I've been having fun modelling the Tau, I'll probably continue working on them as well.  My original Tau force is painted up in a WW2 US army green scheme with the corresponding white star decals.  I'm not sure if I should continue it with these models or come up with something new but related.   The standard Farsight color scheme is a deep red with some grey trim. 


If I went with that, I'd go with a "russian" decal style with red stars instead of the white to signify the "ally" status and the more martial stance of the Farsight enclaves as well as the "communists in space" stereotype that the tau in general evoke at first glance.   Alternately, I could continue the motif a bit further by doing a WW2 Russian brown base color instead.  Alternately, I could research a USMC scheme to contrast my US Army one for my main Tau force.  I admit that I'm fairly ignorant about WW2 USMC schemes beyond watching some John Wayne movies as a kid and vaguely remembering a patchy camo.  Over the weekend, I'll try and look up a few more options but feel free to comment if you have any ideas in the meantime. 

Wednesday, April 1, 2015

Crisis Suits - old and new

I worked on both my existing Tau army a bit over the weekend as well as the next addition to my Farsight enclave ally force.

First up is my new-ish Tau commander that previously was a standard fireknife loadout (plasma rifle/missile pod) but is now a weaponless "Buffmander" with numerous support and signature systems that buff the unit he is attached to.  With him are two new converted markerlight drones to help him with his new role.


Next to him you can see the converted fireknife enforcer suit as well.  This picture shows the size and proportion differences between the two sculpts.  I cut and reposed both legs to allow him to lean to the right.  The left leg just needed some glue but the right ball socket hip joint needed to be constructed with green stuff and my meagre sculpting skills after reposing.  The missile pod is actually a left over tank bit from my Heavy Gear collection.   Next up should be the final enforcer crisis suit for my Farsight killteam.

After that, I'll have to figure out which of my three unfinished projects will actually be finished first.  I'm leaning toward the Tau above but I'm open to both the 28mm VOTOMS and Space Wolf Primarchs as well.  Let me as always know in the comments if there is a blog follower favorite.

Thursday, March 26, 2015

Tau Commanders Tweaked

After noticing that my eyes somewhat awkwardly were drawn to the Captain Morgan prominent hip and crotch pose of my Commander Farsight conversion, I decided to tweak the pose a bit to decrease the hip joint angle there.  I also decided to take the middle ground in relation to the ribbons and instead added the bonding knife to the hip with the ribbons pointing into the front view instead of adding all the cloth bits.


For the second model in the small ally force, I decided to try and model the special character Commander Brightsword as a younger subcommander shas'vre model leading a crisis squad.  I did a couple of blue tac mock ups of this model with various arm poses and even different weapons (swords in the hands vs blades under the forearms for example) and decided to go with the following.


The in game loadout for this model will be a shas'vre upgrade to enable access to the fusion blades signature system along with the prerequisite twin linked fusion guns.  I used some long barrelled fusion guns from a turret I converted to a aegis defense line gun to give it a bit more menacing look as well as reposed the legs to give it a leaning forward running pose as well.  I plan on finishing this project with two additional crisis suits with a fireknife pattern (plasma rifle and missle pod) to fill out the mandatory squad.   Here is a group pic of the two built commanders:


Monday, March 16, 2015

Converting Models For the Greater Good!

Sorry about the delay in posting but frankly I haven't had too much to update until this weekend.  My hobby funk has for the most part continued as I did a few more base colors on my Ferrus Manus conversion but no part of him other than the cloak are finished.  I'm having a hard time finishing up the models (painting) but I did get up enough enthusiasm up after checking out some of my favorite hobby blogs and youtube channels for inspiration to build/convert another model.

I picked up in a trade some Warhammer 40,000 Tau Crisis commander suits that I'd been wanting for two years since they came out.  I really like the extended look of the models compared with the squat almost chibi look of the previous plastics.  The forgeworld variants that came out a decade ago are a marked improvement over the plastics but the sculpt on the "new" commander is definitely my favorite.  I decided to convert one into a Commander Farsight model as I'm not a fan of the official one.  The cloven hooves strangely bother me (but the weird toes don't!) and the pose and ribbons seem at odds on the model.  


This was only my third ever finecast model worked on and they've definitely improved on the QA and casting quality in the years since they introduced it.  Unfortunately, the bar was set so incredibly low that even marked improvement still puts the finecast material in the substandard category IMO compared with other companies' resin offerings.  While the giant detail obliterating bubbles are largely gone (at least from the last two models I worked on), there are still alot of uneven surfaced that should have been straight and which require careful trimming next to easy to lose details.  Some pieces didn't fit right so had to be warmed and straightened.  Each piece had double the number of LARGE vents compared with resin both from GW's subsidiary Forgeworld as well as Dream Pod 9's Heavy Gear line.  Both torso corners had bubbles on my model (one on the crisp corner and another enlarging the notch seen above on the right chest) as well as more on the top of the model.  I lucked out in that the biggest flaws on the chest that would have been the most difficult to fix were actually obscured from view by the arm poses described below.  I'd rate finecast right now at about a C+ grade compared with the previous F that it deserved as it is still markedly more troublesome to prep, fix, and clean that comparable materials and offerings.  It's a bit sad because I think the sculptor knocked it out of the park with this particular model.

Getting back to the actual model, the key defining feature of Commander Farsight in the tau army and model range is his focus on close combat.  I decided to use a spare sword from a 40k Eldar Wraithlord kit to arm my conversion model. I've seen a bunch of folks use the rather large sword for the conversion for years but I've only ever seen one model that was built using it as a large two handed sword instead of in a single hand.  It took some creative clipping of the elbows and posing but the sword and the troublesome limbs finally lined up in the correct shape.  The original model has a leaning back pose which didn't fit with the whole samurai robot motif so I decided to give him a bit more leaning forward and aggressive pose.  In order to properly position the leg, I needed something to prop up the foot adecided to use a spare rock rubble piece left over from Ferrus Manus.  After incorporating that on the 40mm base, I actually came up with the idea of using the rest of the leftovers from my primarch to surround Farsight with marine casualites.  I plan to magnetize the scenic display base to snap "over" the game legal 40mm one.


He's armed with the large alien tech sword, a shoulder mounted plasma rifle, and the shield generator fixed to his back powerplant.  Here's a pic of his next to some other Tau and 40k models for a size comparison:


You can see that the newest crisis variant is less "squished down" than the others (the original plastic suit on the left along with a Forgeworld variant character on the right).  I like that it finally looks like the Tau infantry figure can actually fit in the chest of the crisis suit in something other than a 3rd trimester fetal position!  Of course, I'm a bit of a nut for proper scaling in 40k as this blog shows so you'll have to excuse my bias.  Let me know what you guys and gals think and what can be improved.  I'm debating whether or not to put a loincloth and some cloth draping on the model to honor the original "ribbons" festooning the official model but I'm frankly not a fan of the idea.  My marines are already festooned with stuff like that and I rather enjoy the more clean and practical look of the Tau.. or at least as practical as you can get with a flying giant anime robot armed with a big sword.  :)  

Saturday, February 14, 2015

Scale Pics and Quick Hobby Update

Hobby work is slow going but steady and I've gotten a few basecoats done on the Ferrus Manus model as well as his cloak.  He isn't close to being ready for a pic but he is coming along.  On another site,  I was asked why I'm doing such a large scale for the models so I decided to post a scale comparison shot to show the difference between the models.  Space marines in the lore are 8ft tall in their power armor approximately but that scale isn't demonstrated when you compare them to a "normal" human as portrayed by a guardsman.

In the pic below, you can see from left to right: a normal human, a human in power armor, a space marine in power power, a human in terminator armor, and a space marine in terminator armor.


I think those types of conversions fit the fluff a bit better than the official models provided by GW.  My Ferrus Manus model though is a bit of an aberration in that he is technically in power armor of sorts but a tiny bit larger than even the model on the right.  Here is my first old Blood Angel codex cover that I personally consider to be the definitive size comparison of Terminator armor (the largest model in my first scale shot):


I hope that helps answer some of the questions (if any) regarding why I'm supersizing a few marines.  As a final comparison shot, here below is a Warhammer Fantasy Ogre that I converted a while back to a Shadowrun RPG character I was running.  With the use of the primarch, the marine in terminator armor ends up beyond just shy of eye to eye with an ogre whereas the human in terminator armor, while still bigger than an unarmored one, is still towered over by both.