Showing posts with label 3D printing. Show all posts

Friday, October 23, 2020

Finally cleaning supplies have arrived and so has a 3d print!

 It took over six months but I finally got my hands on some more isopropyl alcohol so was able to run a 3d print this week!  I decided to start with my recent Rafm scale Hunter and got some decent results.

I didn't have a fully assembled hunter to compare him to so the above incomplete on will have to do.  I actually used it as a basis for sizing the 3d model (specifically the height to the top of the hips) but obviously I didn't account for the overall bulk.  My previous attempts including changing proportions but I don't think I'll do that this time but rather I'll simply resize it down to about 90-95% when I try again.  I thought the details looked a bit soft on the resin so I decided to prime the fig and retake the picture.

Why try again?  Besides just being too big, I didn't optimally place the parts on the print plate and had several flat surfaces parallel to it.  While that won't cause a complete failure, it did cause two other less serious ones on the shoulders.  Both shoulders have a loss of detail on the part of the model that was facing the build plate as resin collects there without draining.  Fortunately, it's not very visible from the front as the right shoulder has the problem on the back and the left on the top.  Additionally there is an aliasing step error where the shoulder was just barely off of parallel causing portions to print in steps at the layer resolution.  Initially I thought this was an issue called z-axis wobble but, upon looking at the sliced layers, I saw the real culprit.  It's not actually visible to the naked eye on bare resin or even primed in normal light but it could catch and pool washes in the final painting step.

 
Well, that's it for now.  I'll probably attempt another print run next week as unfortunately their is rain in the forecast for the next couple of days and I won't be able to post-cure my model in the sun.  As always, thanks for reading and feel free to comment below!

Thursday, October 15, 2020

Only Digital Bytes to Show...

 for my hobby efforts this past month!  I've been out of resin and running low on alcohol to clean the printed models so I haven't actually printed anything in a while.  I've kept busy though tweaking/converting 3d models for potential future printing though from scifi RPG character models to Star Trek spaceships to Heavy Gear stompy robots.

I restarted tweaking my old HGA Heavy Gear Hunter model yet again.  I had problems with the two prints that I previously attempted and I tweaked the loadout on this version to be a basic Hunter instead.   I previously attempted a multipiece print for my second try but wasn't happy with the results.  After some encouragement from Ashley over at the Paint it Pink blog (link), I decided to try it again and was eventually able to both split the parts and set up a ball and socket connection system between the parts.  

One of the flawed gems of the last console/pc generation was IMO the first Force Unleashed game (the followup was admittedly a rushed cashgrab abomination!).  I really liked the look of the Sith Stalker variant of the character model and never saw an official model/miniature other than a single toy figure in a larger boxed set.  I recently found a decent 3d model likely ripped from the pc game so it definitely needed conversion to a printable tabletop gaming 3d model.  I thickened up various bits to make them sturdier/more likely to print successfully as well as changed the pose as much as I could without any actual knowledge of video game animation.


And finally we have a selection of Star Trek ships that have been converted into something that more resembles a different era.  First up we have a DISCO ship that I've converted into an NX era ship.  The second is another DISCO ship that I've tried to convert into a TMP era Akira class.


Thursday, July 16, 2020

Quick update... Shadowrun Mage Heroclix Repaint

I worked on the second half of the heroclix figure that I used for my Troll character figure.  She started as a Red She-Hulk figure (hence the skin color) that I repainted and added magic effects via 3d printing in clear resin.  Yes, I've accomplished what cheap prepainted miniatures did in 2006!  Hey, it's still a first for me.

I'm happy with the detail and color of the clear resin (that I colored bluish via a wash to less than stellar results).  Somehow the figure didn't seem too dark in tone despite having jet black hair and clothing but now seems like it after I repainted her in dark grey clothes.  I keep debating whether I should strip the paint off completely as it shouldn't damage the resin itself as people have been using acetone to clean resin post printing in the post-Covid rubbing alcohol shortage.  For now, I'll leave her alone but I may revisit this figure at a later date.

Friday, July 10, 2020

Still alive.. and making RPG character models!

It's been a few weeks of silence so I figured it was about time to show signs of (hobby) life here on the blog for the world to see!  While I haven't been a busy bee like Ashley over at the Paint it Pink blog (link), I've done a small bit during the past month.


I finally got around to some easy painting with a redo of some heroclix figs I picked up a while back for RPG characters.  One was initially for the Starfinder campaign that I'm in but I decided to go with my Krogan character instead of this Suli-jann Solarian.  The original fig is the Caiera clix model from the Planet Hulk series that I rebased and repainted relatively quickly.  I'm not entirely happy with the results though (too much wash in the armpit for example) but I've already overcoated the models and don't want to strip them completely to redo it.  The second one was a troll personal assistant character (think half bodyguard/half butler!) for use in Shadowrun.  That one came from a Hulk clix double model that I converted with a troll-like horn and a more appropriately sized 3d printed pistol.  He actually came based alongside a Red She-Hulk model that I can also convert into a Shadowrun character model as well so you may see that sometime on the blog as well.  Hopefully I've improved my eye technique since my Lt. Googely Eyes Hussar model; I really did have to make the eyes tiny in ever shrinking steps despite my gut instinct to get the result above instead of what happened before.  This is just average work and not even my best by far but it's basically a single weekend's worth of effort from start to finish (including drying time!) and more importantly completed work unlike my ever growing 3d printed pile of unpainted shame.  :)

Additionally, I printed out both of the 40k Lieutenants previewed in my last post but the Space Wolf was marred by multiple misprints.  I was testing out a new slicing program that apparently requires more manual supporting of models than I initially expected based on youtube reviews.  The Blood Angel did turn out well but I plan on redoing his loincloth icon as it wasn't extruded enough in the print unfortunately to be much of a visible detail after priming/painting.  I printed him out at a smaller traditional marine scale (32mm) so I may still assemble him and leave the revised version for a possible later full scale 40mm primaris fig.


Monday, June 8, 2020

Too many cooks? More 40k Lieutenants!

While it's only been a few weeks since my last update, it's been a few months since I worked on any 40k 3d model conversions after my initial attempt at a grimdark Winged Hussar was taken down.  I've still been visiting the various websites to see what others are uploading though and something piqued my interest.  There was a recent take on Krom Dragongaze (link) uploaded using the same base model by MrMcAngry (link) that I previously used for a different Blood Angel Lieutenant so I decided to tweak him into something more customized for a potential RPG character. It's not really visible below but the space wolf does have a full wolf pelt on the backside of his cape whereas the blood angel has a full bolter instead of a pistol. I hope to run a print this upcoming weekend with these two models (probably in smaller true 28mm scale rather than 40mm for primaris) so will update the thread with actual model pics if I do.  I don't plan on uploading either though to any website.


Edit:  Since initially posting, I've tweaked the model a bit more.  I shrunk the head a bit so that it would actually fit inside a helmet and also reduced the size of the axe blades a bit.  I'm a bit unsure about the latter as I've found that weapons that look "right" on a 3d model tend to be too fragile and undersized when actually printed but I'll see if that holds true this time.  Additionally, I made the pelt on his cape significantly larger as it looked like he decorated his armor with an adolescent wolf's pelt instead of a more fearsome adult's.


Monday, May 25, 2020

Quarantine Kitchen Sink Update

Hello to everyone and I hope all are doing as well as possible during this pandemic.  It's been a while since I last updated the blog and initially I hoped that the extra time would lead to increased hobby progress.  Unfortunately, that hasn't panned out and the only project I've accomplished is growing my first beard.  :)

I haven't been totally comatose though so I decided to post a kitchen sink update instead of boring folks with multiple smaller ones.  My most recent project, my digital Winged Hussar (link here) was unfortunately C&D'ed by GW as apparently they claim ownership of all future grimdark space Poles.  Shortly after uploading, it disappeared from my account and it took me over a month to get a response from Thingiverse letting me know that GW had claimed my model and forced its removal.  Strangely, many of the component parts are still there as are thousands of other 40k models so I have no idea why they targeted it (along with a couple dozen others for DMCA takedown) as they included no justification.  I have to say that it put a damper on me continuing that project.  I had initially wanted to convert one of the new official Master Lazarus models to a Winged Hussar but the idea of giving them $40 plus shipping/tax is much less likely now.  I completed another conversion parts set that will likely never be uploaded and Lt. Googely Eyes will have to do for now if I ever need an RPG figure.


CBS All Access offered everyone a free month so I was able to catch up on two seasons of nuTrek.   I'd previously written up a very lengthy review of Season One of Discovery (linked here) so I wasn't particularly optimistic given that the same folks were still involved in running the show(s) and that reviews written since weren't particularly flattering.  I will neither be verbose nor include any spoilers so no worries if you haven't watched either of the recent seasons.

Picard was, as expected, a major disappointment.  Admittedly, like with the movie JJverse, they did set the expectations early on with the star stating that it would NOT be like TNG and that it would, more recently, focus on real world hot button issues like President Trump's election and the Brexit vote.  Sadly, those descriptions of the direction of the show were spot on and it was a complete mess except for one (possibly overly nostalgic) episode.  If you're a long time fan who pines for an optimistic view of the future that Star Trek used to be known for, look elsewhere.  Heck, the TNG Mirror Universe comics are probably a more optimistic and hopeful depiction of Star Trek than this show.   As for Discovery Season 2, it was a definite improvement and approaches "OK" with some actual exploration and an ensemble cast doing trekky things before it devolves yet again into a CGI schlockfest of action you can't make out while Michael Burnham saves the universe.  While I don't have any hope for Season 3 of Discovery, the Pike/Spock/Number One dynamic was a definite improvement (albeit still flawed) and the recent announcement of another spinoff show focused on them might prove the adage correct about the third time being the charm.
 

On the home 3d modelling and printing front, I've mainly focused on random RPG characters for the Starfinder campaign that I'm playing in.  I've done up multiple versions of the Krogan that I'm playing as well as a flying space monkey in armor (based on Overwatch's Winston), a small round alien mechanic/gunner (based a Mass Effect Volus with 40k bits), and a skittercommando (a Starfinder iconic race).  I haven't actually painted up any models yet as my campaign has gone virtual (and intermittent) but I do hope to at least finish a Krogan this month.


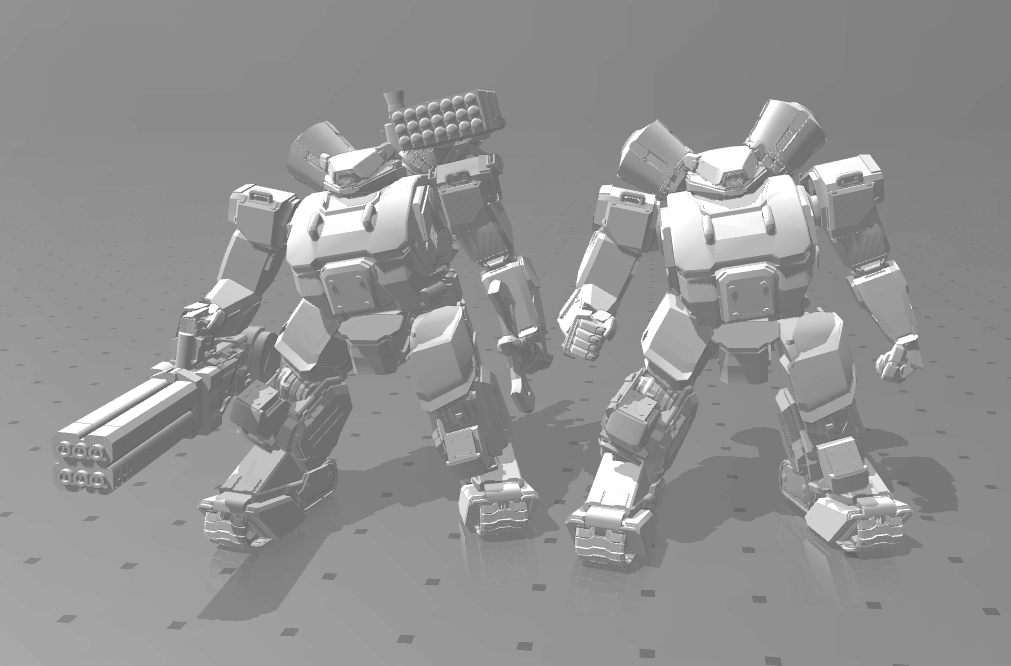
And, finally, I did finish cutting up and printing out the various parts for my 3d Heavy Gear models with some mixed results.  I resized and reproportioned both the Hunter and the Grizzly but I can't help but disagree with my initial assessment that something closer to the official models would be an improvement.  Judging them on their individual merits, I think the "chunkier" versions are better.  Overall, I also think that the Hunter XMG is better suited to home 3d printing than the Grizzly and will likely at some point paint that one up to match my army colors.


Well, that's my bimonthly update for now!  Thanks for reading and I hope to have some more progress to post at the end of the month.

Sunday, March 15, 2020

The Winged Hussars arrive... in 3D!


It's been a while since I worked on my custom Winged Hussars chapter but I finally got around to the project but this time on the virtual hobby desk with a 3d model for the chapter.  I practiced first with both samurai and Ultramarine 3d models I've already posted here and now I've made a Winged Hussar variant using the same pose inspired by the Amulius model.

I made a custom shouder pad using the hussar symbol of the Polish 1st Armoured Division that served with the British in World War 2 (link here) as well as a Polish eagle converted into a double headed 40k style Imperial Aquila for his shin.  Hopefully that along with the actual wings on the back and a suitably slavic moustache will give the model enough visual flare on the tabletop.  If you're interested in downloading the model for free and printing it out yourself, feel free to check it on thingiverse here: 


Monday, March 9, 2020

Goldilocks and the Three Gears

I thankfully had both (relatively) warm and dry weather over the weekend and was able to print out a round of Heavy Gears.  I resized the various proportions and printed out both the Panda/Grizzly and Hunter XMG as multipiece models.  While the former turned out well, the latter had a misprint and needs another round of printing.  I was able to assemble the heavy support gear and decided to build it up as a Destroyer Grizzly armed with a heavy bazooka.


On center left is the original versin and on the right is the resized one.  While it's not evident from my photography, the detail is crisper than the original and, more importantly, crisper than it appears on screen.  It's still not equal to the traditionally cast metal minis from the official line but an improvement over the original.  I'm not entirely sure I've gotten the resin settings exactly dialed in and might attempt some test cube prints if I can find something useful.

I have to admit though that I'm not entirely happy with the new proportions as they now appear too thin which is surprising since I only shrunk the model on the XY plane by about 5% according to the statistics.  Much like the blog post title hints at, I might need to print out a third with proportions in between to get it just right since I'll be doing a third run regardless for the printer.  With that model, I'll also try out a different weapon loadout as well with the traditional panda minigun instead. 

Monday, March 2, 2020

Courage and Honour! Ultramarine Primaris Captain 3d Model

For some inexplicable reason, I revisted my idea for remixing (i.e. digitally converting) a 40k primaris Ultramarine captain this weekend instead of working on my recent Heavy Gear models or painting my Rising Son 3d printed marines (link).  In between faffing about (since I'm using proper British spelling/nomenclature this post!) and watching series 2 of Altered Carbon, I combined over a dozen different files from thingiverse to make this 3d model.


Hopefully he is suitably ornate to represent an officer of his fine chapter!  I haven't played the game regularly since 5th edition (it's currently 8th) so I can't comment as to whether his loadout is optimal on the tabletop.  Regardless, he's armed with a relic chainsword, bolt rifle, bolt pistol, and iron halo.  If anyone prints it out or has any ideas on how to improve him visually, feel free to comment below. 

Edit:  I've added a second variant to the model at the same link as above that I'd like to call the Lion of Ultramar for obvious reasons.  :)

Tuesday, February 25, 2020

A Pyrrhic 3d Print? My first Heavy Gear attempt

As mentioned in the last post, I attempted to accentuate the details on the model that weren't likely to print successfully like rivets and thin armor plates.  When zoomed in, the 3d models look pretty good!


These were an absolute pain to support properly but eventually after a few hours I was ready to print despite multiple crashes of the slicing program.  The print didn't have any obvious failures but it looks like both the depth of details and the overall scale aren't dialed in yet.


The print was done at 50 micron layer height with anti-aliasing enabled which normally turn out better than shown above.  The smaller Hunter XMG looks to have crisper corners but both could use some improvement in that regard as well as further thickening of details when possible.  Additionally, they're a bit bigger than I expected compared with the official models.  The hunter is simply too big but the grizzly is a bit too wide (though the height is good).  

As you can see in the unassembled picture, I did have an issue with weak joints on the models with a limb fracture on each while attempting to remove the supports.  Admittedly I could have been more gentle but there were a TON of supports to remove and I had to pull off areas of light supports as a group when possible.  The supports under the groin and butt plate were so thick that they were effectively a solid scaffold a few millimeters away from the surface of the model instead of a series of vertical trunks.  I've never had fractures like that in the past using the same technique so I definitely think the modular nature of the models (as opposed to models that are one piece) contributed to the weakness. On the plus side, I do think that the overall look of the models is good and will fit in with the other HG figs I have both in the Blitz scale shown above as well as the older RAFM scale that I've covered previously.

To cut down on the density (but not total number!) of supports needed, I've separated the models into a trio of parts each(engine, upper torso, lower limbs).  I've also done a third round of thickening of details like the rivets, hip armor plates, and antennae so that they'll be more stable and obvious.  Finally, I'm adjusting the individual dimensions/proportions of the models overall to better resemble those of the official models.  I hope to have positive things to report with my next round of printing this weekend!

Wednesday, February 19, 2020

Introducing my custom Heavy Gear Panda and Hunter XMG!

Recently, I was toying around with 3d modelling when I decided to try and extract the 3d models from the Heavy Gear Assault game.  Unlike last time, I was successful after an update of the programs used to accomplish it!  After looking through the models and animations, I settled on their Hunter and Grizzly models.  Both look significantly different from the original RPG and tabletop versions but luckily had "advanced" updates in the fluff that they could represent.

The Hunter was the simplest as it had a prebuilt model in the files so I started with that one.  I went through and removed various bits and bobs that are unlikely to print at such a small scale (whether Blitz or Rafm) as well as thickening up things that need to stay but have similar issues.  I added some extra details to make it more like the XMG like the head comm vanes and the shoulder armor ram plates (from Lego bricks!) as well as virtually kitbashing the MAC and rocket pod.  I also replaced the in game riot shield with another from thingiverse instead.


The grizzly was more difficult in that it needed to be preassembled from individual parts due to the in game armor damage and customization systems.  I went through the same process with this model to instead turn it into a Panda upgrade.  More parts were free-floating and  disconnected in this model so hopefully it will print ok when that time comes.  With the Panda, I needed a very heavy autocannon (think 40k assault gun or scifi chaingun) and I kitbashed one from a Titanfall weapon and the ingame gun.  I was hoping to give it a more angular look since it's a northern gear but hopefully it's still obvious enough as to what it is.  Similarly, I assembled from various parts the larger rocket pod and put it on the shoulder as it couldn't fit in back with the heavy mortar.  I also cobbled together tracks for the feet as they were missing (maybe they're a texture image file in game?).


Surprisingly, the pc game has both gears built on pretty much the same height skeletons so I decreased the size of the Hunter XMG by 15% to give me what turns out to be RPG artwork accurate relative heights between them (thanks Alberorius!).  With Ashley's help with RAFM measurements, I'll compare them to the RAFM physical models as well as the Blitz scale ones.  After a few more cleanup inspections, I'll be trying to print them out hopefully this weekend.  Wish me luck!


Saturday, January 25, 2020

State of the Blog Address (2019 in Review)

I have to say that this year passed by quickly!  It's basically a blog tradition that I go over what I did and didn't accomplish over the past 12 months and this year is yet again a bit of a mixed bag.  I'm the traditional hobby front, 2019 wasn't unfortunately much different than the prior year.  I managed to finish what I thought would be my final Winged Hussar (link here) as well as four figs for basically the same rpg character idea.  Why so many?  Well, the character changed as well as my ideas of how to portray him.   The first fig (link here) was printed on shapeways for a previous defunct campaign attempt whereas the others were done at home on my only big hobby project purchase, the Elegoo Mars 3d printer.

I had previously thought I was done with my hussar project but the upcoming release of Master Lazarus for 40k as well as a free 3d model from Artel W might convince me to dip my toes back into that pool later this year.  In the meantime, I've taken a stab at samurai inspired space marines instead with some success (link here) that I have yet to paint as well as a Space Wolf that at least I finished (link here).

Too big...too small...just right!

On the Star Trek front, I made a few entries to my SHIELD UP! house rules section.  While I didn't end up revising my Fasa STSTCS ship manual, I revised the existing D-15 FASA ship (link here) as well as added the Atlas dreadnought to my STA house rules (link here).  I also decided to test out a theory regarding whether you could noticeably improve prepainted heroclix minis with a quick wash and/or drybrush (link here).    Finally, I  came up with some more nuanced rules for playing STA in the Enterprise/NX era of trek (link here).  In that same update, I previewed a 3d version of my old NXL ship design which later got a test print or two (link here) but I never did more with them.  It's not alot but I suppose an optimistic way to look at it would be that I put out at least quarterly trek updates if averaged out for the year.  I don't have any ambitious plans for the trek side of the hobby but I do hope to revisit printing my NXL design now that I'm more experienced with supporting prints as well as coming out with a short Klingon D-7 update for FASA.  I generally need a direct motivation for my hobby work and the lack of any real chance of playing anything trek related locally unfortunately hampers that.
 Cactus Trek!

Ending the recap on a positive note, I was finally able to find a relatively stable rpg group this past year.  While I'm not enamored particularly with the ruleset (review link), it works for me as a player and we've been managing a monthly game since the summer.  It's because of that campaign that I've been focused more on my Krogan miniatures than the others.  I'd love it if we were playing longer than the 3-4 hours per session we average as well as playing every two weeks as originally planned instead of monthly but it's a good group of easy going players and I'm glad to have them.  With that, my yearly TL;DR hobby therapy session post is over and I wish everyone a happy 2020!
 
Another upcoming Krogan RPG character mini!

Sunday, December 29, 2019

Dialing in the size and resolution... Rising Son V3.0!


I had some time this weekend and decided to asymetrically resize the same pose and support structure and reprint the model at 50 microns.  I fully admit that this was the easy way out but I figured I'd give it a shot to check out the proportions as well as the more typical 50 micron layer height that I normally print at.  At about 6 1/2 hours print time, I'd personally say that the detail and the proportions compared with the official primaris marine are both pretty good though there is a softness on certain parts of the face and aquilla on the more recent print compared with the previous one.  We still didn't have any real direct sunshine to speak of with another pair of rainy days so the resin remains a bit rubbery (and wet from the water rinse in the case of the newest print as I took the pics right after!) so it's still a bit hard to make out the details in the pics.  After some post curing, it'll be off to painting for the smaller RPG scale and correct scale marine but I think I'll leave the primarch scale print as is.  Now I just need to find out what paint scheme I intend to use.  I'll definitely do a base of gloss black but I'm not sure of what color highlights and details that I'll end up using.

Friday, December 27, 2019

Rising Son One Piece 3d Test Print


I finally got around to printing the one piece assembled Rising Son marine and the results are definitely interesting.  I resized the model from the previously printed one to 85% but it looks visually like it's closer to 66%!

There are a couple of reasons that could contribute to that seeming discrepancy in size.  The first is that previously I printed the parts separately so the little gaps with glue could increase the size of the final model whereas I definitely overlapped them when combined it all digitally.  Second, resin does shrink both with printing and temperature and the ambient temperature was 10-15 degrees below my previous print that was done during a relative winter heat wave in my area.  It's supposed to only be a 1-2% but maybe it's more.  Additionally, this was done with a slightly different resin (same manufacturer but now with an "ABS-like" moniker added to it) so maybe that contributed.  I virtually measured the model to the top of the hair and the final result is only about 1mm below what I expected; it was supposed to match the Amulius in height but the picture isn't an exact comparison as Amulius is sculpted onto a small 2mm high rubble platform on top of the 40mm base.  The final and biggest difference is likely the various proportions in that the official primaris model while better proportioned than normal marines is still far enough from human shaped to make a difference.  With my previous 3d printed models, I noticed that I definitely needed to "thicken" models 10-20% to get them to look good on the tabletop versus good on the screen.  When I arrange the next marine pose, I'll probably increase the height by 5% and the width/depth by 10% to give them bulk more consistent with the official models.

The good news is that at least at first glance I don't see any obvious miscasts.  The sword edge is a bit chipped and I had to level out the butt plate as it was edge was a bit curved so I sanded it down.  The parts that I was worried about ahead of time like the helmet and chest horns and banner actually came out IMO pretty good.  I still have to cure the model (which will probably take a few days given the lack of daytime direct sunlight forecast locally) as well as trim a few more nubs but I did what I could with the rubbery flexible resin without damaging it.

I don't want to sound like I'm unhappy with the results as I'm not but just wanted to hit the potential issues first in the post.  Regardless of the above, I'm actually happy with the size of this first 1pc model even if I plan to change further prints.  This particular model actually fits quite well on a 25mm base and makes for a good RPG model as it's more in scale with other figs compared with official primaris.


Thursday, December 12, 2019

Rising Sons Primaris Marine Test Model


Well, it took a few days of printing due to misprints as well as another couple of days in order to have enough sunshine to post cure the model parts but I finally printed and assembled my first Rising Sons primaris marine.  I printed him out bigger (closer to primarch size than primaris) in order to see how the details resolved and overall I'm happy with the results.

I printed him out in pieces and assembled him as you would a normal marine but I think the next rescaled version I'll attempt to print at the "correct" size.  I do see some things that I want to change though to make sure the model will be durable enough to see play on the tabletop potentially.  You may notice that he isn't using a chainsword katana as I had many problems trying to get that to print correctly with the teeth on both sides of the sword so I switched it to a power katana instead.  I suppose that will necessitate a promotion to Lieutenant as well.  :)  Additionally I turned the sword inward for stability reasons as the separately printed parts left a rather fragile wrist; that shouldn't be an issue with the one piece model though but I would like to hear whether the sword position is better like this.

I also had a misprint where the supports weren't solid enough on the exhausts of the backpack so I took the opportunity to redo that as well since the Cyberpunk Oni symbol was too fine to survive priming printing.  I'm still not happy with the overall dimensions of the back banner though and will likely redo it again with the rescale.  I'm leaning towards using the sashimono style banner but redoing it as a traditional 2nd edition 40k T-shaped sergeant banner.  I'll have to thicken up the parts significantly as even at primarch scale (52mm to the top of the head) they're quite fragile.  I'm not sure what icon I'll use (aquilla?  raptor?  oni head?) as well and wouldn't mind some feedback on all of the above.  Here are the other pics from different angles.


Wednesday, December 4, 2019

Rising Sons Samurai Space Marines Project

My previous attempt at a historical conversion of Primaris marines into Polish Winged Hussars went well enough (link here) so I figured I'd give another famous warrior group a shot.  In the months since, I got my first 3d printer (a resin SLA Elegoo Mars) and have been experimenting mainly with figs for an RPG campaign I'm in.  A whole bunch of high quality primaris style 3D model uploads are on thingiverse so I decided I'd try my hand at a fully virtual conversion and settled on a Samurai motif.  I suspect the general familiarity with samurai armor is pretty high so I won't post pics of historical resources used for inspiration like I did with my Winged Hussar project.  The main samurai components that sparked my interest were uploaded by indignentshrew on Thingiverse (link here).  I'm still resizing the various parts for primaris and deciding on the various design flourishes I plan to add but this is the initial mock up of my first Rising Sons Intercessor Sergeant.  Please note that I can't 3D model anything more than a simple cube or sphere so am limited to the more traditional physical conversion techniques of cutting/pasting from existing sources (3d models in this case instead of from my bitz box!).


It's hard to make out but the icon on his chest aquilla and on his sashimono banner is the Cyberpunk 2077 Samurai logo.  I have serious doubts as to both (especially the chest) printing correctly so I do expect to adapt them this week.  Additionally, I'm not entirely happy with the size of the sashimono so will likely enlarge that as well as reposition the chainsword katana a bit more at an angle.  In case it wasn't obvious, my primaris inspiration for this pose was the recent event exclusive Lieutenant Amulius figure that I also used to convert my Lt. Googely Eyes Winged Hussar.  :)

Sunday, September 22, 2019

Supporting your miniatures.. Literally!

Since getting the printer, I've been spending time honing in some settings as well as getting the hang of properly supporting home printed 3d models.  My initial foray(s) were mainly using auto generated supports with a few extra that I added for spots that I thought needed them.  Unfortunately, the results didn't turn out so well as shown in the previous post.  I've been learning more about where and when to place custom supports and they've improved the final appearance of the model with each iteration (newest print on the left, oldest on the right).


It's not perfect by any means as, despite my added supports, the gunclub (a combo of the two weapons for the RPG character) remains a bit bowed where it meets the hand but at least the globs of fused support and model are gone.  I didn't notice any areas of failure to print so I'm probably (other than the before mentioned gunclub) adequately to overly supporting the model.  As long as the cleanup is manageable and mostly invisible, I'm ok with the latter!

Here is the final result painted.  From L to R, we have a GW Primaris marine, my earlier Shapeways printed Krogan, my recent home printed Krogan, and a prepainted Star Wars miniature circa 2008.


Overall, I'd put the crispness of the detail somewhere between my (admittedly dated) prepainted PVC miniature and modern GW plastics at the above printed layer height of 50 microns (with a 47 micron accuracy on the XY plane due to the 1440p/"2k" LCD screen).  For something printed at home in a few hours, I'd call that a resounding success considering it took me over a month to get the Shapeways krogan after payment!   It's unfortunately not an exact like for like comparison though as my 3d modelling (or more accurately tweaking) skills have improved somewhat and I did learn how to smooth out the obvious polygon facets visible on the krogan as well as his layer height being set to approximately 1/3 (16 microns) that of the home print.  At least for my thoroughly mediocre painting abilities, I don't think the added difference shows in the final product.

Along with the krogan, I decided to reprint NXR Star Trek ship as well since I had plenty of room on the build plate and wanted to test out both the custom supports as well as a true vertical orientation on the model at 50 microns instead of the previous 45 degree angle/20 micron/auto support print shown on the left.


There is some difference in this model in terms of fine detail but I can't say whether the orientation or the layer height had more to do with it.  It's evident in the overall softness and the shallowness of the depth of the saucer elements like the cover over the front saucer tip where the original NX deflector was.  Like the krogan, this model wasn't specifically made for 3d printing so shallowness of details is to be expected somewhat but it's a bit more muted than I expected.  I haven't painted this model (obviously ) and I am curious how much of it will show through after a layer of primer, paint, and wash are applied.  Regardless, I'd have to test out a fully vertical 20 micron print to see how much of that loss is due to each factor.  Due to the length of time that would take, I'd probably wait to do that for when I'm ready to print out a full build plate of Trek ships so as to maximize the results for the longer print as a vertical starship is significantly taller than my other mainly wargaming character prints.

Well, those are my 3d printing results for this past week.  As always, feel free to comment below and thanks for reading.  More to come in about a week!

Friday, September 13, 2019

Adventures in Cloning Krogans

After getting my first 3d printer last week and doing an initial pair of test prints last weekend, I've been trying to test out some additional models at a higher level of detail (20 micron layer height instead of 50) in the days since.  I decided to go with three models that I tweaked myself from existing models for my first build plate.  Included was the Star Trek NX refit that I previewed a few weeks earlier, a purpose built for 3d printing 40k model of a Sister of Battle that I converted a chainsword onto, and another custom posed Krogan that I built as a possible RPG character model for a Starfinder campaign I just joined.  I used the automated standard supports to build a scaffolding around the models and added some manual supports for small islands that were missed.  I did a fairly thorough job since I've been watching youtube channels for months detailing failed models and they did indeed print entirely and were well bonded to the build plate.  Mission accomplished!... or so I thought.


The front/top of each model was quite nice and I was incredibly impressed with the level of detail.  Individual teeth on the chainsword printed perfectly and even portholes on the starship are visible.  The only misprint I found was the sagging barrel on the Krogan's gatling laser club and the deflector on the NXR bonded with the secondary hull. Unfortunately, the undersides of the models were much worse as I saw when I removed the supports.


Each model is a example of a different kind of error with supports.  The supports on the back of the Sister of Battle were on occasion too close to her and tiny bits of resin trapped between them bonded the two together leaving large, ugly messes resembling superglue blobs.  The amount of surface area needed to print the starship at a 45 degree angle (so as not to be taller than the other models and increase the 7 1/2 hour build time by another hour or two) meant a large amount of supports and the standard auto setting left many pips that have to be individually removed after the support itself is clipped.  The krogan was lacking any supports on the top of the gun barrel as it was printing vertically on the build plate and supposedly didn't need any but sagged for some reason around the hand.

Obviously it was time to go back to basics and rewatch any videos dealing with placement of supports.  In the next post, I'll detail what I learned, what I changed, and show some of the results.